
WORKFLOW BASICS
Oracle Primavera Cloud (OPC) is a Project and Portfolio Management platform that enables organizations to plan, track, manage, and report on projects, programs, and portfolios. OPC manages project schedules, resources, and risks to increase the predictive performance of projects. To support these practices, OPC includes Workflow to develop and use customize processes. Workflows allow you to update, review, approve, and create information in the following areas.
- Budget
- Budget Change
- Budget Transfer
- Idea
- Portfolio
- Project
- Risk
This Tech Tip will review the basics of developing and running a workflow:
- Workflow Design outlines the flow of the process.
- Form Design creates the form to either display or update data.
- Workflow Configuration ties the forms to the design and sets the parameters for each step in the flow, including which form is used on a given step, what the calculation is for an automated decision and the selection options for approvers.
- Start Workflow initiates the run of the workflow.
- Monitor Workflow shows the current status of the workflow.
By separating the workflow and forms, OPC allows one workflow to be reconfigured to work for multiple purposes. For example, a Phase Gate Checkpoint workflow can be created to complete a checklist and get approval. Each Phase could have its own checklist. The configuration for Planning Phase would use the same workflow as the Design Phase but might have a different form and different approvers.
The Close Project process will be used as an example because it has a form to complete, an approval step, and a set variable step.
Workflow Design
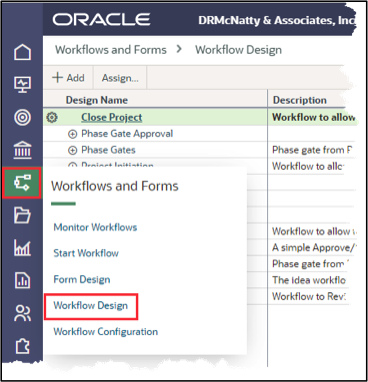
The Workflow Design is accessed from the Workflow and Forms icon in the Workspace menu. It defines steps, decision points, and connectors to lay out the process flow.
Add Workflow
- Click Add to create a new workflow, or select an existing design (ex. Close Project) to open the editor.
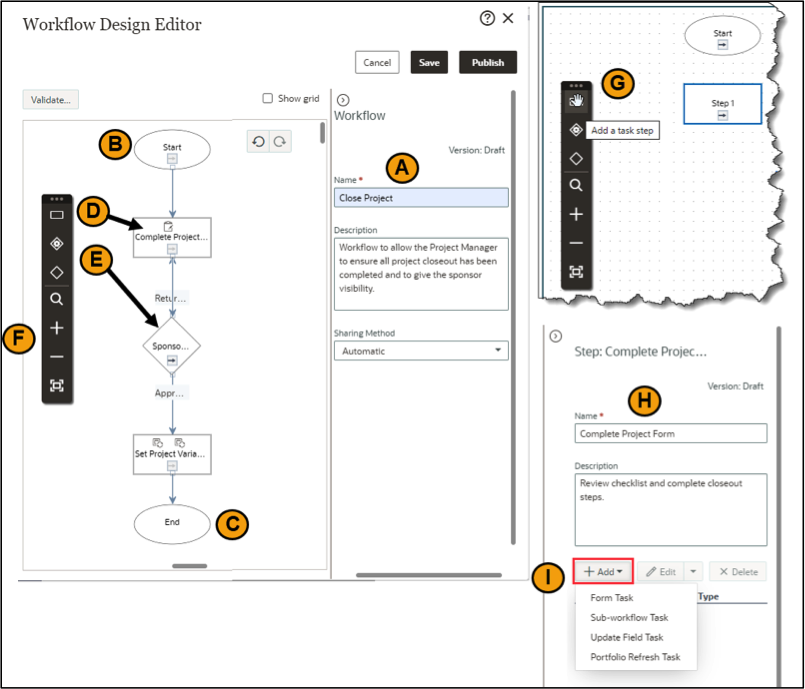
- Enter the Name and Description on the right-hand side of the editor (A).
- Sharing method determines if the Workflow automatically gets sent to child workspaces or if it will be assigned manually to specific ones. Pick Automatic or Manual.
The workflow is developed on the left-hand side of the window and builds out the process steps between the Start (B) and End (C) points. The black menu bar contains the components available to include in the design. Available menu options are:
- Task Step (D) is used to update a form, spawn a sub-workflow task, update a field, or refresh a portfolio.
- Decisions Steps (E) can be either automatic or manual. The Automatic Decision determines the flow of the workflow based on the settings in the Workflow Configuration. A Manual Decision presents options for the assigned user to pick which will change the direction of the flow.
- Zoom options (F) make the editor change the display by moving in and out. This is especially helpful for very involved and large process flows.
Add Task Step
- Add a Task step by clicking on the rectangular icon (G) and dragging it onto the editor screen.
- In the definition screen (H), enter the name and description.
- Click the Add button (I) to define the type of step. More than one step can be added. Options include:
- Form Task – Review or update data through a form.
- Sub-workflow Task – Insert a separate workflow that can run in line or be spawned to run simultaneously with the current workflow.
- Update Field Task – Change the value of a field.
- Portfolio Refresh Tasks – Update the Portfolio to include changes to the project that may affect a record in the portfolio.
Add Decision Step
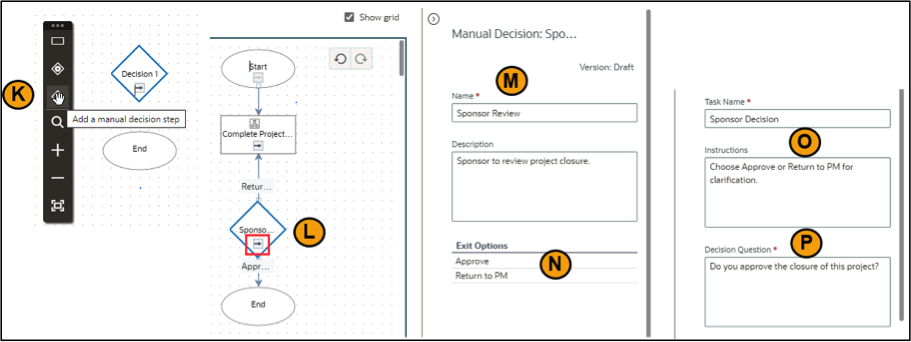
- Add a Decision step by clicking on the diamond icon (K) and dragging it onto the editor screen.
- Complete the name and description (M) details in the definition window on the right.
- Set up the Decision Exit Options (N) by clicking on the arrow within the Decision step (L) to initiate the link and then click on the step the decision should send the flow (ex. End if approved or Complete Project Form if not approved).
- Rename the Options (N) to indicate what the decision point is. In this case, Approve indicates that the sponsor is good with closing the project. Return to PM means it is going back to Complete Project Form for rework.
- Change the Task Name and Instructions (O) to reflect the decision.
- Update the Decision Question (P) to prompt the user when choosing the option.
Link Steps
- To establish the flow between non-Decision steps, click the link button (Q) for the initiating step and then click the box for the next step.
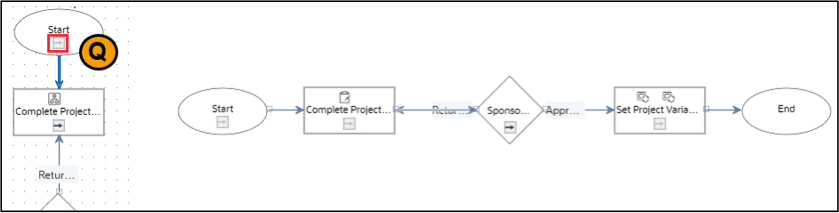
The final workflow design for the Close Project process includes a Complete Project Form (Form Task), Sponsor Review (Manual Decision Task), and Set Project Variables (Update Field Task).
Validate
- Click the Validate button (R) to show errors that need to be corrected.
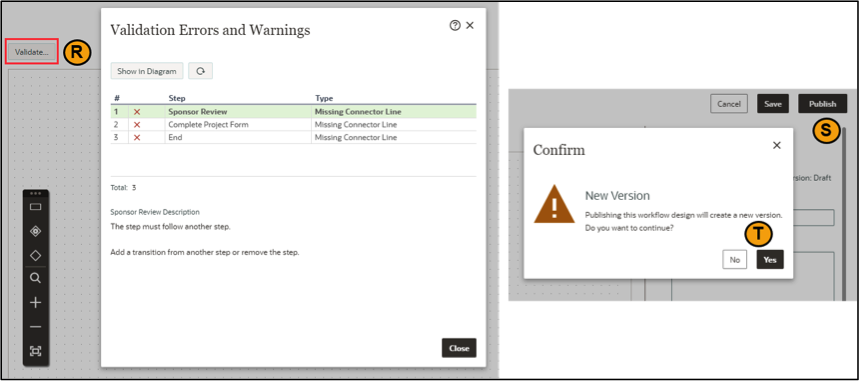
Publish
- When all of the errors have been resolved, click Publish (S) to finalize the version. The Save button stores draft revisions of the workflow until it is published as a new version.
- Click Yes (T) to confirm the new version.
Field Design
The Form Design is accessed from the Workflow and Forms icon in the Workspace menu. It is used to organize the fields used to present or capture data through the workflow.

Picking a form or clicking Add at the top will open the Form Editor.
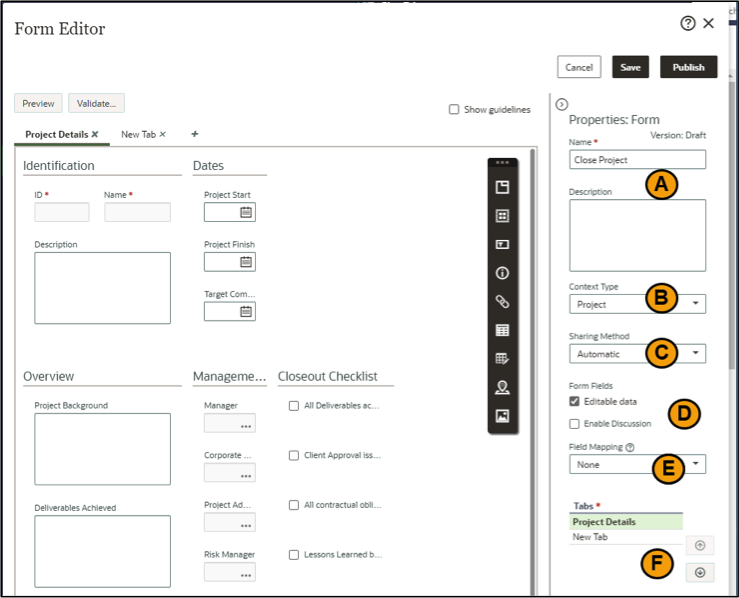
Update Properties
- Start by setting the form Properties by updating the Name and Description (A).
- Select the Context Type (B) to match the data to be included in the form (ex. Project, Risk, etc.).
- Pick the Sharing Method (C) to determine if it is automatically available to all sub-workspaces or must be manually assigned.
- Check the Form Fields (D) Editable Data and Enable Discussion options to allow the fields to be updated and the discussion bubble to be available.
- Field Mapping (E) allows Idea data to be mapped into the form. This is mainly used when moving an Idea to a Proposal Project.
- The Tabs section (F) displays if more than one tab is used in the form. The arrow keys change the order in which the tabs are displayed.
Add Tabs and Group

- To add a new Tab, click on the Tabs button (G) in the Menu Bar. This provides a second page to the form.
- Double click on the New Tab text to change the name.
- To add a new Group within a tab, click the Add Group Box (H) button. A Group allows multiple fields to be organized as a unit
- Update the Title field (J) to change the name of the group. The Hide group box frame and label checkbox will remove the lines from the group.
- The Usage options (K) allow the fields to be edited or required.
Add Fields
- Click the Input Fields (I) button to open the Select Fields window.
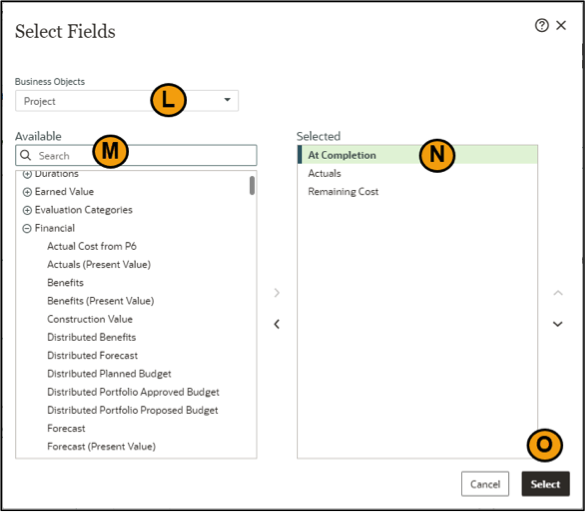
- The Business Objects (L) displays the type of data used in the form. If the context of the form is Portfolio Project, the Business Objects field will allow Portfolio, Portfolio Project, or Project data to be selected. For others, the existing context value will display.
- Move fields from the Available (M) column to the Selected (N) side by double-clicking or using the arrows.
- When done, click Select (O).
Set Field Properties
- The size of the Group Box or the individual fields can be changed by clicking on the edge of the object (P) and moving it left and right.

- Select a field to modify its Properties. The Context option (Q) is typically set to Same as form.
- The Usage (R) options determine if the field is editable and/or required. When the workflow is executed, required fields must be filled in before the form can be saved or submitted. Required fields will have a red asterisk beside them.
- For fields that may not be populated yet, the Default Value option (S) allows a value to be set at run time. It is recommended that this be filled in for Codes that are to be updated as part of the workflow.
- For Text fields there is also a Height in Rows option for setting the size of the text box.
Groups and fields can be moved around the form by clicking and dragging them to new positions.
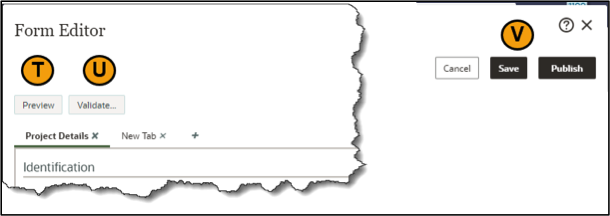
- Use Preview (T) button to view the form. If data exists, the form will display sample data.
- The Validate button (U) checks the form for any errors.
- The Save and Publish (V) buttons will save a revision of the form or publish a new version.
In a workflow that has multiple steps, different forms can be used to build on the information from prior steps. For example, in the Risk Identification process there may be 2 steps: Identify and Assess. The form for the Identify step may just have Name, Identifier, and Description in it. The form for the Assess step may have those three-plus Cause, Risk Level, and Recommendations. Each step can use a progressively more complete form.
Workflow Configuration
The final step in the workflow development is configuring the components together. This is where the forms and action performers are combined with the workflow design to complete the specific process.
The Workflow Configuration is accessed from the Workflow and Forms icon in the Workspace menu.
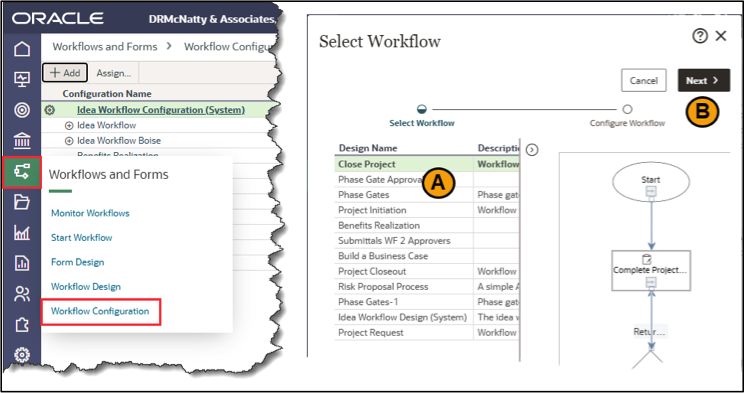
- Click Add to create a new configuration.
- Select the workflow design to use as the base (A) and click Next (B).
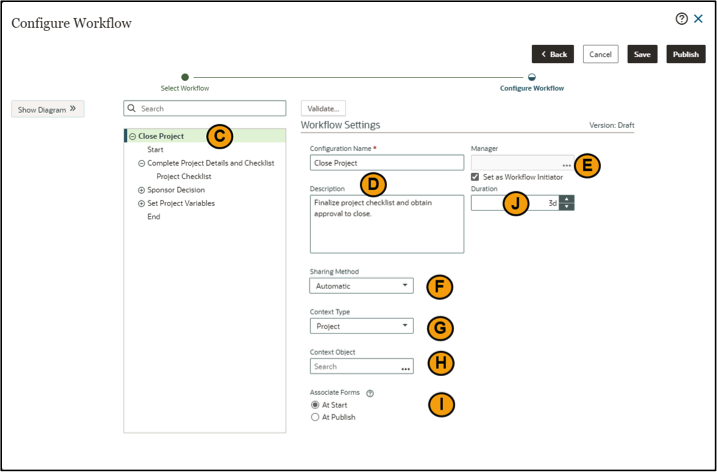
Define Configuration
- Select the top-level (C) of the object list and update the Name and Description (D).
- The Manager (E) field is used to determine who can monitor and complete tasks on behalf of the other task performers. They can also assign workflow tasks to individuals. The Manager can be selected from a list of User Groups or by checking the Set as Workflow Initiator check box which will assign it to whoever starts the workflow.
- Set Sharing Method (F) to Automatic or Manual. Manual requires the workflow and configuration to be “Assigned” to child workspaces, allowing only specific ones to have it. Automatic makes it accessible directly to all child workspaces.
- Context Type (G) determines the type of objects the workflow configuration can run against (ex. Project, Portfolio, Risk, etc.).
- Leave the Context Object (H) blank to allow the workflow to run against the project (or other context types) chosen at the start-up. Specifying an object limits it to the one selected.
- Associate Forms (I) determines which versions of the forms and workflow are used when it runs. The At Start option pulls the latest published version when executed. At Publish will preserve the forms and workflow in place at the time the configuration is published.
- The Duration field (J) designates the amount of time the task performers have to complete the step. If they do not complete the tasks on time, the system notifies the workflow manager and task performers. It is also used to mark the task overdue.
Set Step Options
The Step represents the object in the workflow diagram. It contains the Tasks that were defined in the workflow. The settings here define context, duration, and error handling.
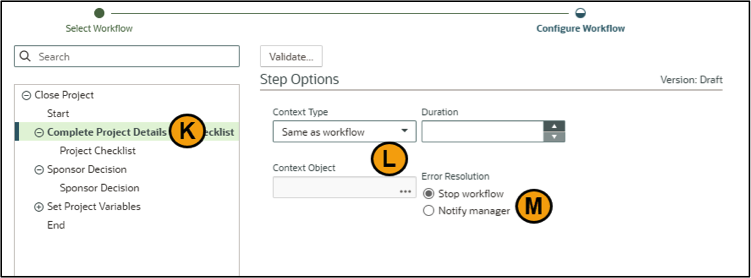
- Select Step (K).
- Set the Context Type (L). This is usually left as Same as workflow but can be changed. If changed, the Context Object option can be set to specify the project, risk, or another item that aligns with the context type.
- Use the Duration field to set the notification and overdue timer for this specific step.
- Set the Error Resolution (M) to either Stop Workflow or Notify Manager. In the event of an error, Stop will end the process while Notify will leave it in an error state and the Manager identified in the configuration Workflow Settings will need to address it.
Set Task Options
The Workflow defined the tasks (ex. Form Task) to be performed but did not specify the form or who would execute the step. The Task Options define those settings.
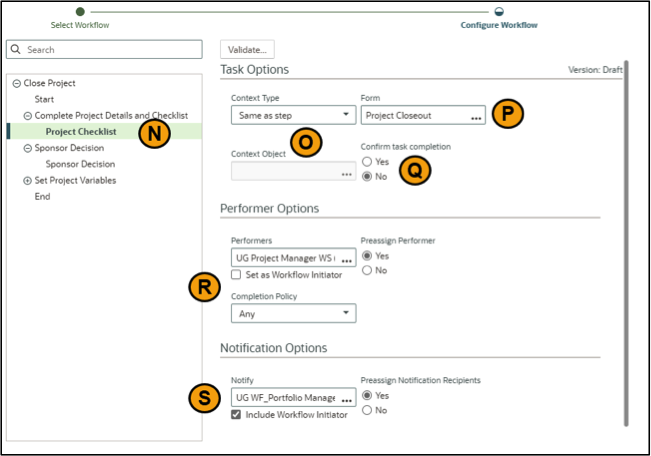
- Select the Task (N) to be configured.
- Set the Context Type and Context Object (O). This is usually left as Same as step to carry through the settings from the workflow to the configuration and into the step, but it can be changed here if needed.
- Select the Form to display for this task.
- Set the Confirm Task Completion (Q) to Yes to display a “Is this task complete?” popup when the submit button is pushed for the task during execution.
- The Performer Options (R) determine who is authorized to execute the task.
- Set the Preassign Performer to Yes to allow the workflow to determine who to notify to perform the task based on other settings. When set to No, the person submitting the prior task will select the group or individual to perform this task.
- The Completion Policy can be set to Any, Majority, or All to determine how many people from the Performs list need to complete this step. Any means only one needs to respond. Majority is one more than half of the performers listed. All requires everyone listed to respond.
- Notification Options (S) specifies which other users should be notified when the task is complete. The Include Workflow Initiator option notifies the person that started the workflow.
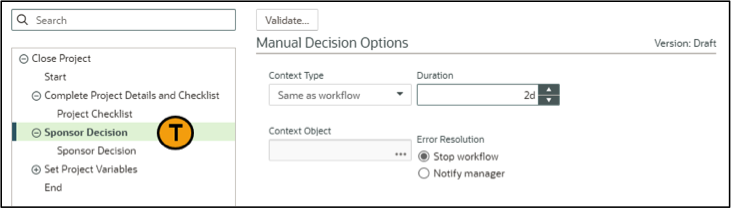
Set Decision Step Options
The Decision Step Options (T) are similar to those for a normal Step with Context, Duration, and Error Resolution.
Set Decision Options
The Decision Step Options are similar to those for Task Step Options. The main difference is the Voting Type (U) option.
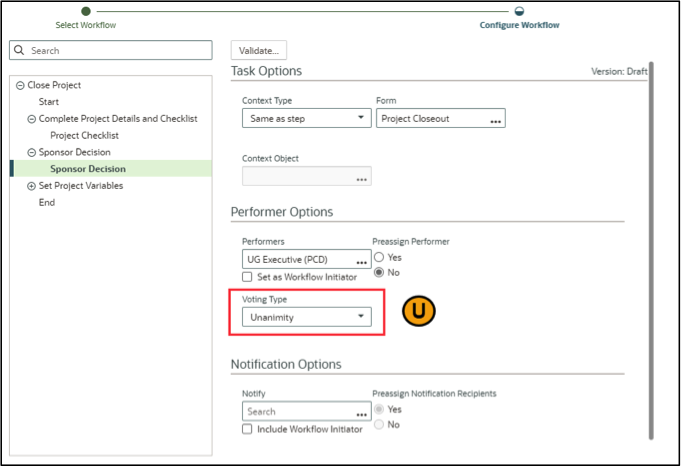
- Set the Voting Type to use when determining which path to take based on responses from the performers.
- Any – The first performer to respond determines the direction
- Plurality – The option with the most votes determines the path. Used mainly when there are more than 2 options, the direction is selected once enough people have responded to determine a tie is not going to happen. In the event of a tie, the workflow manager is the tie breaker.
- Majority – The workflow proceeds when one of the options receives more than half of the votes.
- Unanimity – The workflow will not proceed until everyone agrees upon the direction.
Set Project Variables
The Set Project Variables Task Options allows the value of the specified field to be changed.

- Set the Context Type and Object if needed. Generally, this is set to Same as step.
- To specify who sets the variable, check the Select Performer option (V). The system will perform the update on behalf of the selected user.
- The Completion Policy (W) is only available if the performer field includes a group of more than one user. If so, the available responses are Any, At Least Half, and All.
- Select the Update Field (X) to be changed and the Update Value to change it to.
One note about setting variables: If the object type is a Code value, then in the workflow design, make sure there is a default value set. The Set Variable for a Code will fail if the code value is blank, to begin with.
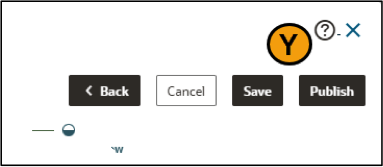
Save and Publish
Use the Save (Y) button to create a new revision and the Publish button to publish a new version.
Start Workflow
Once the Workflow, Form, and Configuration have been completed, the workflow can be executed. The Start Workflow is accessed from the Workflow and Forms icon in the Workspace menu.
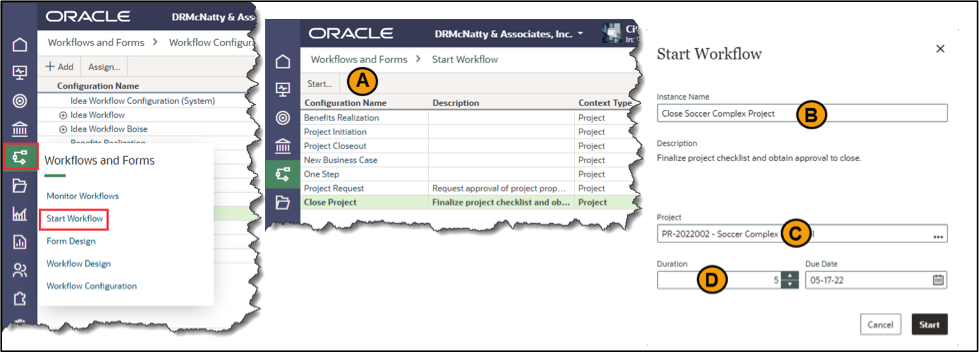
- Select the workflow to run and click Start (A).
- In the Start Workflow popup enter an Instance Name (B). This will be used to identify the specific instance of this workflow, so name it something that will identify it easily. Having 5 “Close Project” workflows running that don’t specify what project each one is for can make managing them confusing.
- Select the project (C) or another object (Portfolio, Risk, etc.) the workflow is intended for.
- Set a Duration (D) for notifications and overdue calculations.
- Click Start to initiate the workflow. This will notify the first performer and kick off the process.
Monitor Workflow
The Monitor Workflow option displays the current status of executed workflows. It is available from the Workflows and Forms window at the workspace level.
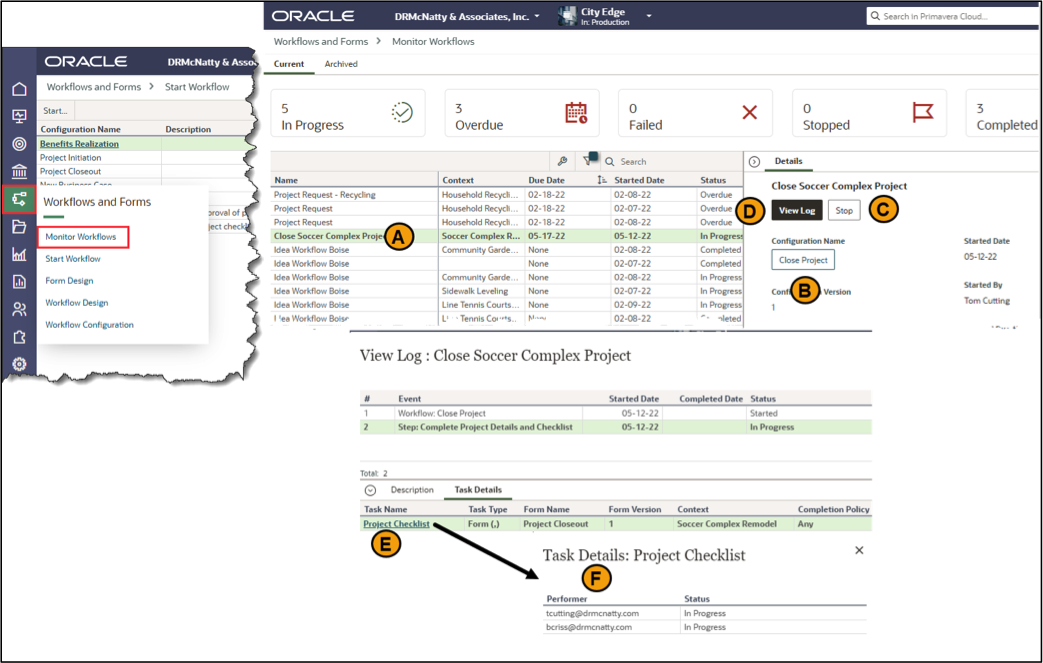
- Select the specific workflow (A) to see the details.
- The Configuration Name (B) will display the diagram and configuration details for the workflow.
- The Stop button (C) will end the workflow.
- The View Log (D) displays the list of actions taken so far on the workflow.
- By clicking on the Task Name (E) in the log, a popup will display the performers for the specific task.
Summary
This Tech Tip provided a quick overview of the different components of developing and running a workflow in OPC:
- Workflow Design establishes the steps, tasks, decisions, and orders that outline the process.
- Form Design develops the layout of the data to be updated or reviewed.
- Workflow Configuration assigns the forms, performers, and other details to set up a specific version of the workflow.
- Start Workflow determines the object (ex. Project) that the configuration runs against and starts the process.
- Monitor Workflow displays the current status, ball in court, and any errors that have occurred.