ORACLE PRIMAVERA UNIFIER & BI PUBLISHER
DOWNLOAD THE PDF HERE
Unifier uses BI Publisher as the reporting engine for its Custom Reports. Where User Defined Reports (UDR) utilize a built-in report engine in Unifier, Custom Reports and Custom Prints use Oracle’s BI server as the engine to run and render these types.
In this tip, we’re going to show you how to look at a custom report with an internal data model in the Oracle BI Publisher tool as a way to assist in troubleshooting issues you might have.
For this tip, we’re focusing on the internal data model type, but Unifier also supports using an external data model as well. For internal data models, you will still make any edits in Unifier; however, we’re going to show you how you can view the SQL created when looking in BI Publisher.
For the custom report with an internal data model, you previously had created the data model in Unifier, generated sample data then created an RTF (rich text) Template layout and uploaded. For this, you worked in the BI Publisher Desktop application and Unifier.
Here, we’re now going to look at how you can find and review this report when logged into the BI Publisher Enterprise server.
Unifier Custom Templates
First, let’s look for the custom report design in Unifier. Below is the screenshot of the Unifier Custom Reports. It is located under Company Workspace > Configuration > Custom Templates. The “Key” column shows the name of the report stored in the system, with the format “uuu_###”
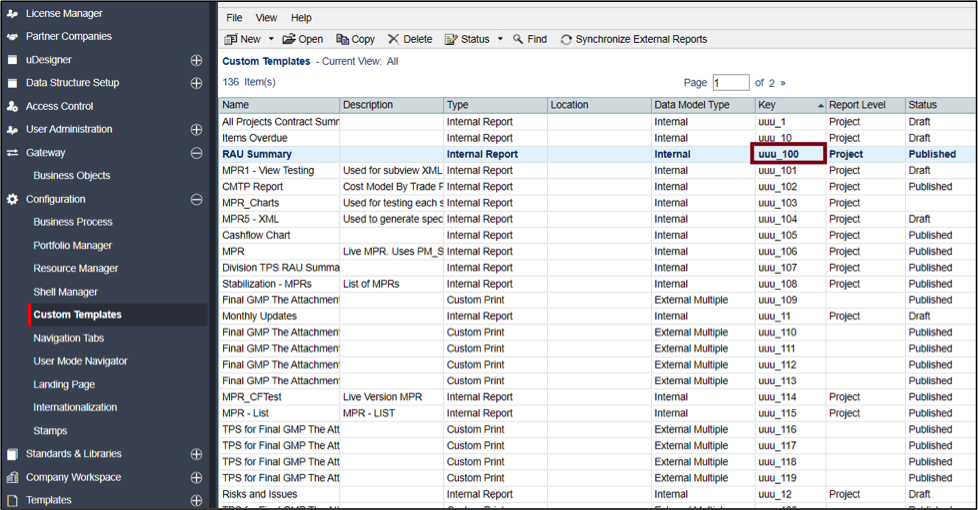
When you create these reports, this key is assigned by Unifier automatically and is used to locate the design in the BI Publisher server, as you’ll see later.
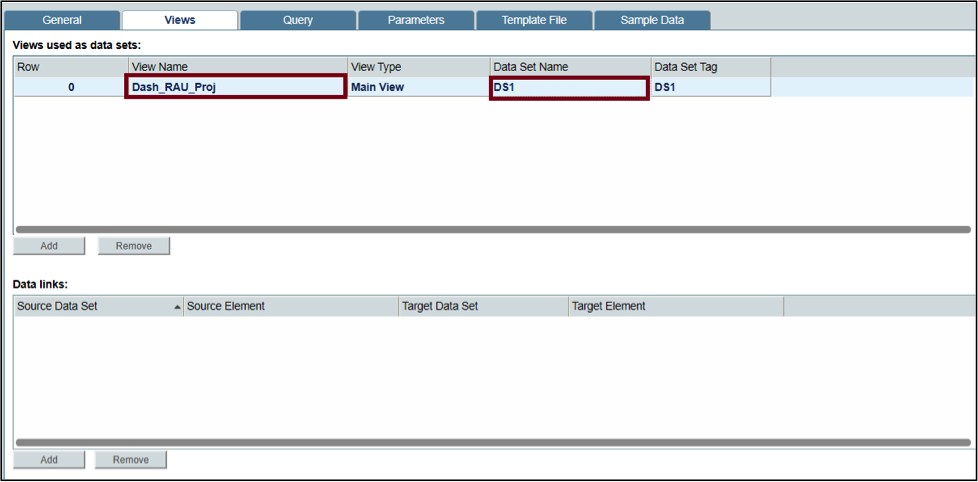
When you open the report, you will see the View Name and Data Set Name under the 2nd tab. View Name is the Custom Data View created in Unifier. The Data Set name is the tag to identify the result set.
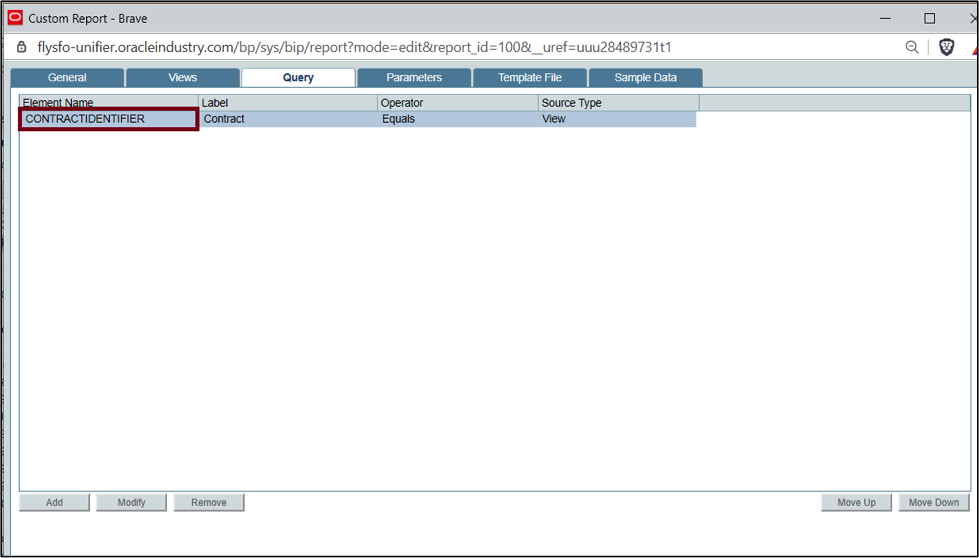
Under the 3rd tab “Query”, it defines the report query condition which gives report users the option to filter the report data set. In this example, it is filtered by Contract.
Oracle BI Publisher Enterprise
Now that you know the name and key of the report, let’s open Oracle BI Publisher and look at the report.
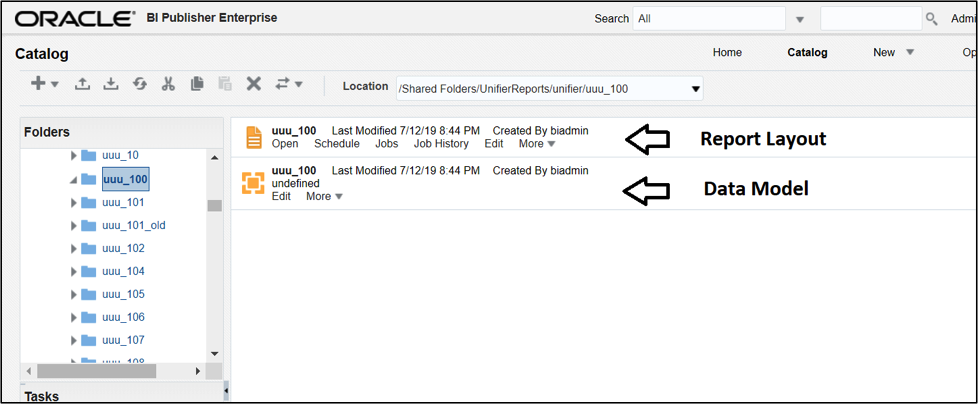
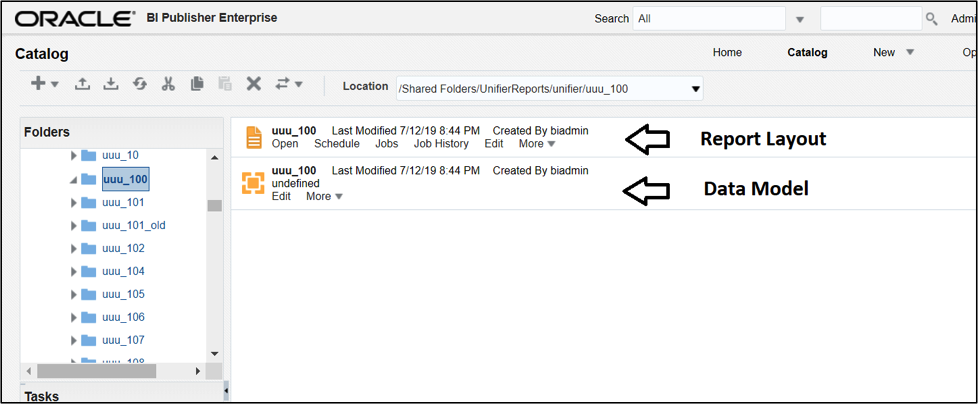
First of all, click Catalog and navigate the Folders structure. Unifier Custom Reports are stored under Shared Folders > UnifierReports > unifier. Under the unifier folder, you can see all subfolders with the “uuu_###” format which is the same as the “Key” value stored in Unifier.
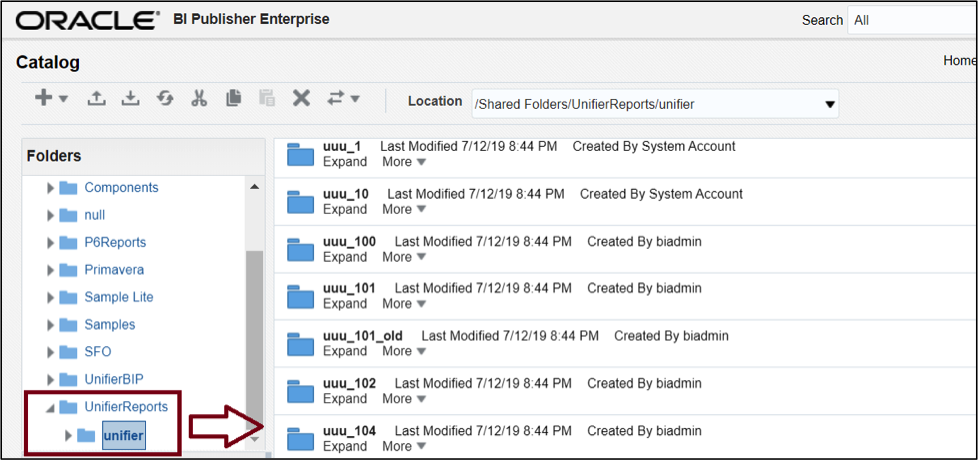
Open each subfolder (uuu_###), there are 2 objects: Report Layout and Data Model.
Reviewing the Data Model
Open the Data Model by clicking “Edit”. The Data Set name “DS1” in Unifier is also shown here. Continue to click “Edit Data Set” under the “gear” icon at the upper right corner of the DS1 Data Set diagram. Pay special attention to the structure of the query. In this example:
select * from unifier__Dash_RAU_Proj where project_id = nvl(:uuu_p_context_project_id,project_id) and (CONTRACTIDENTIFIER in (:uuu_p_contractidentifier) or :uuu_p_contractidentifier is null)
- unifier__Dash_RAU_Proj is the Unifier Custom Data View for this report.
- project_id = nvl(:uuu_p_context_project_id,project_id) is the built-in clause to filter the project shell.
- (CONTRACTIDENTIFIER in (:uuu_p_contractidentifier) or :uuu_p_contractidentifier is null) is the “Query” condition set in Unifier.
The above three clauses are determined during the Unifier Custom Report creation process. Once they are properly defined in Unifier Custom Report configuration page, it will be automatically carried over to BI Publisher and injected in the SQL query.
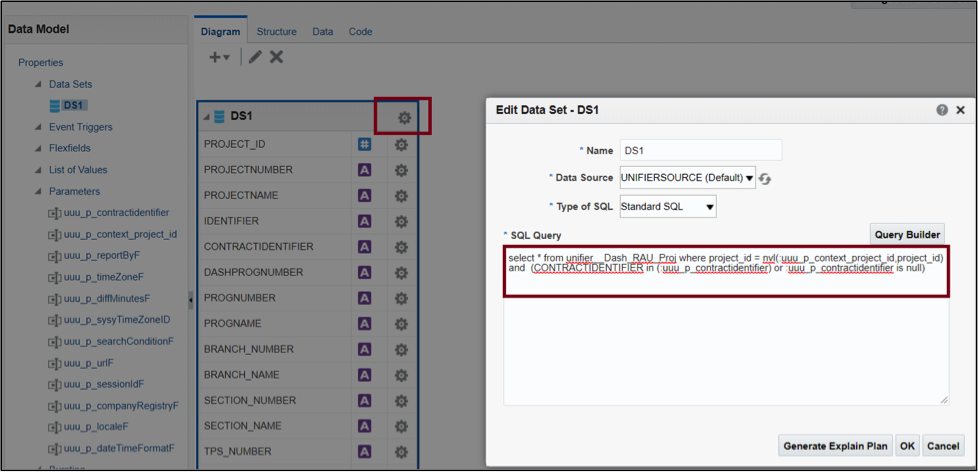
Note: You will NOT be editing this SQL here for this internal data model since this gets generated from Unifier when editing there. If you are creating, however a custom report with an external data model, you would make your changes here in BI.
Reviewing the Report Layout
Next, open the Report Layout by clicking “Edit”. You will see the Data Model identifier “uuu_###” again at the top left corner. You can click the link to view or edit the Data Model.
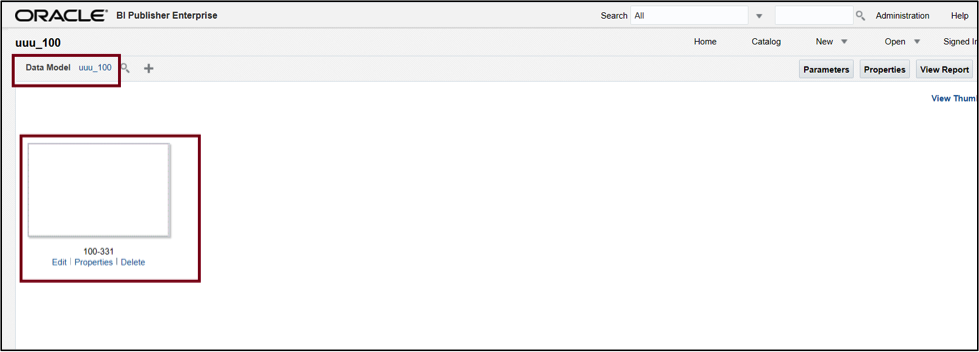
The main content on this page is the Report Layout. Click “Edit” and it will display a file download request which would download the RTF file to your local drive.
The filename (100-331) is the Custom Report identifier ### plus the report serial number. In this example, 100 is the Custom Report identifier, and 331 is the system serial number. This file is exactly the same template file you loaded into Unifier, but with its own name saved in BI Publisher.
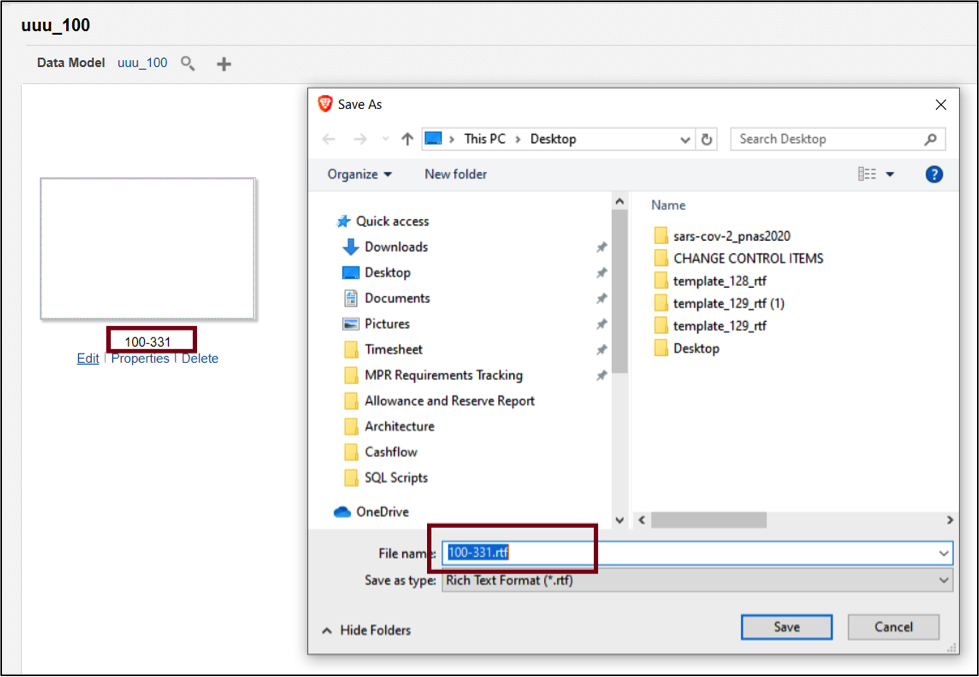
If you previously created this report, you may have a copy of the RTF. Also, you can retrieve this template by downloading it from Unifier. An important note: if you plan on modifying you’ll want to upload the new RTF template in the Unifier screen, not here in BI.
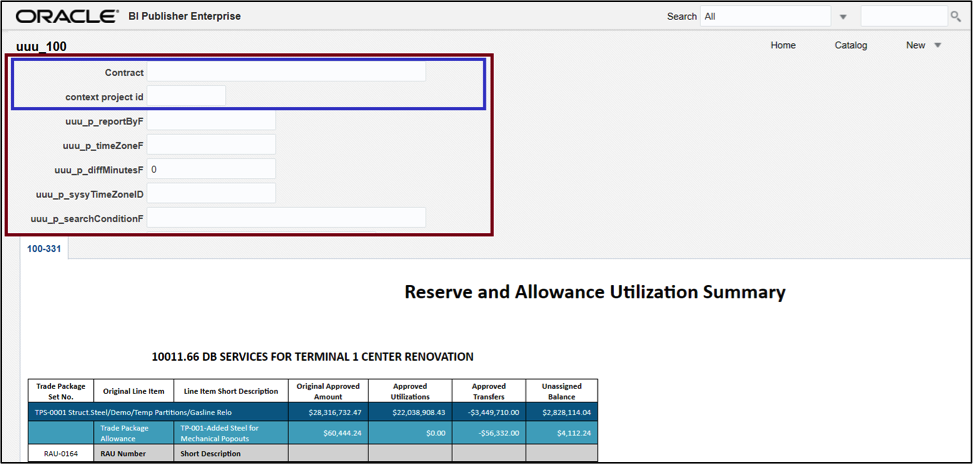
Go back to BI Publisher’s report folder, then click Open to run the report. As you can see in the screenshot below, there are many parameter fields. The essential fields to run the report are highlighted in the blue box:
- Contract: This is the field defined under Unifier’s “Parameters” tab in the Custom Report definition page.
- context project id: This is a system default field applied to any Shell-level Custom Report, which implies the “Project ID” is a mandatory field in the underlying SQL Data View. In the Data View design, Unifier Custom Report at shell level always requires the “project_id” column in the SQL query.
This page also allows us to run Unifier’s Custom Report in BI Publisher directly, as long as the proper parameter values are provided. The result will be the same when running the report natively in Unifier.
One occasion to run the report in BI Publisher directly is for report developer’s troubleshooting. In Unifier, if the report has a problem, it will not display anything other than a blank page. But running in BI Publisher will display the error message on this page, the report display area.
Summary:
While you use the Unifier interface to edit the Internal type data model and use Unifier to upload the revised RTF layout for the report, this review in Oracle BI can be helpful to understanding the report parameters and details and help troubleshoot other elements like repeating groups, conditional sections by reviewing the design here. Also, this engine is used when developing reports with External data model types, which can create reports that are more complex and can even report multiple data sources in one report.
