ORACLE PRIMAVERA P6 EPPM
DOWNLOAD THE PDF HERE
When things turn bad on a project, there are always those that say, “We should have seen that coming.” In many cases, that is true. As a project manager, I would hold Risk Assessment sessions in which I asked the team to envision the demise of the project. In the exercise, we picture ourselves at the end of the project, sitting in a room discussing what went wrong. It’s a simple question: Why did the project fail?
“Inspections. We always seem to be waiting for inspectors to show up and it keeps us from moving forward, sometimes by a week.”
“Permits. This city is a stickler for permits and they always take longer than expected. It can put the project on hold for a month.”
“Subcontractor delivery. If the subcontractor doesn’t complete clearing the site on schedule, we may miss our window of opportunity before the rainy season.”
Often these types of risk are dutifully written down and pulled out later as excuses when they actually happen and the project fails. Real Risk Management turns these potentially devastating items into actionable plans to address them before they take down the project
This Tech Tip outlines the Project Management Institute Project Management Body of Knowledge (PMI PMBOK®) approach to Risk Management and show how Oracle’s Primavera P6 Enterprise Project and Portfolio Management (EPPM) application puts it into practice.
Plan Risk Management
To manage risk effectively, you first have to agree on how risks should be managed. This step documents how risks will be identified, analyzed, and handled throughout the project. Although not captured in P6 EPPM, the Risk Management Plan is important for communicating how the application will be used as part of the process.
Identify Risks
The Identify Risks step is simply the act of getting items that could potentially impact the project out in the open for discussion. Whether you use the worst case scenario exercise or some other method for identifying risks, logging and defining the risks can be done in P6 EPPM in the Projects tab, Risks window.
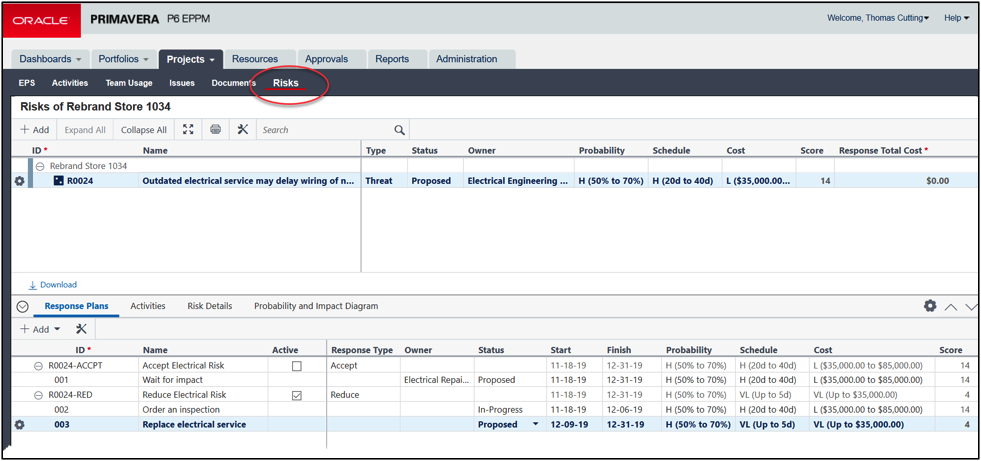
Identified risks can be entered into the risk registry by clicking the Add button to open a new line.
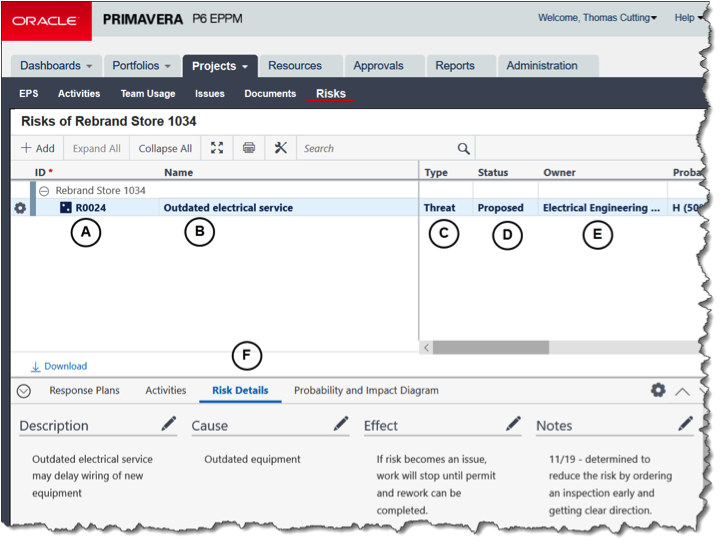
For the Identify step, the following fields should be filled:
- ID P6 EPMM will automatically create an id, but if you have a standard numbering method, you can replace it as long as it is unique.
- Name Replace the generic name with a meaningful one.
- Type The options are Threat or Opportunity. A Threat is something that will negatively impact your cost or schedule. An Opportunity is a risk that may benefit your project. An example of an Opportunity would be a monetary incentive for completing the project ahead of schedule. For this type of risk, you are creating a plan to make the risk come true instead of stopping it from impacting your project.
- Status Options include Proposed, Active, Open, Rejected (Closed), Managed (Closed), and Impacted (Closed). When to classify your risk as one of these options is something that should be decided and documented in your Risk Management Plan.
- Owner Any Resource can be selected as the Risk Owner.
- Risk Details In the Details window at the bottom of the risk is a tab that holds the Description, Cause, Effect, and Notes. Use these to define the risk in a way that explains the true impact to the project. For example, saying, “The electrical service is old” is not helpful. The team needs to understand the impact of that to the cost and schedule. A better Description would be “An inspection may determine that the outdated electrical service isn’t sufficient to power the new equipment, causing a 2 week delay for permitting and replacing it.” The Cause and Effect can be used to clarify further. Notes can capture additional information throughout the project.
Not all risks identified will warrant a plan of action, but ones that remain unidentified can seriously impact the project.
Perform Qualitative Risk Analysis
Qualitative Risk Analysis prioritizes risks based on a pre-defined rating scale. This is accomplished by estimating the Probability of the risk occurring as well as the Impact to cost and schedule that it represents. Probability and Impact are measured on a scale of 1 to 5, Low to High, or some variation of that theme. These are used in a Risk Matrix to determine a Risk Score.
Probabilities and Impacts are defined in the Administration tab on the Enterprise Data window under Risk Thresholds.
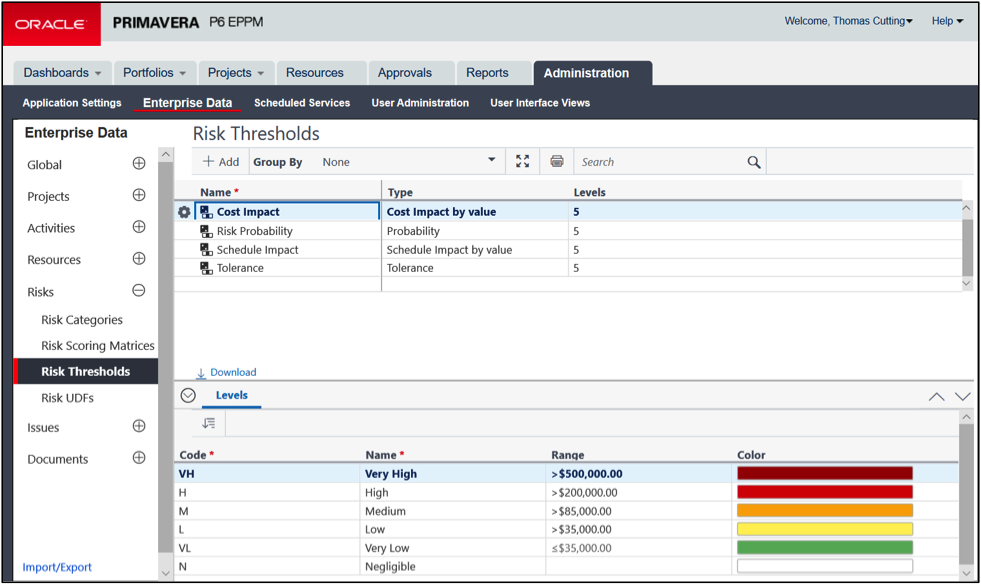
In the example below, Probability is measures from Negligible to Very High with ranges based on percent chance that the risk will happen.

Schedule impact range is typically measured in number of days the project would be delayed. Below the scale is Negligible to Very High, but the range shows < 5 to > 40.

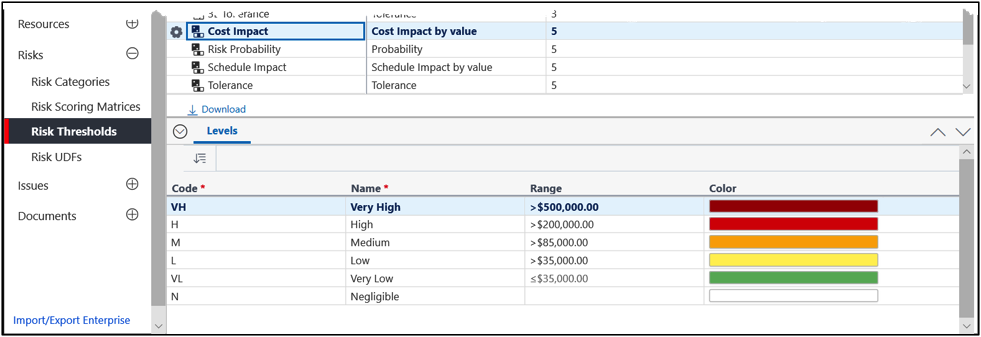
The Cost Impact range is measured in dollars from Negligible to Very High.
The Probability and Impacts can then be assigned to each risk.
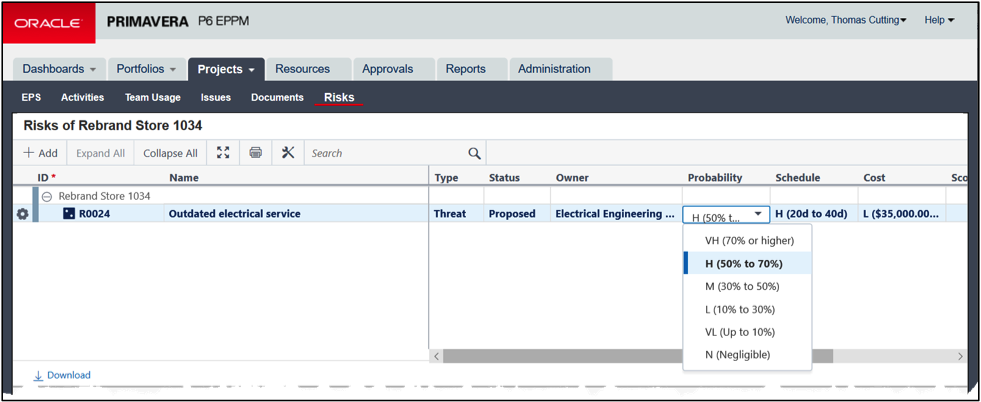
Probability and Impact thresholds are combined in a Risk Matrix that defines the Risk Score for each Probability / Impact selection.
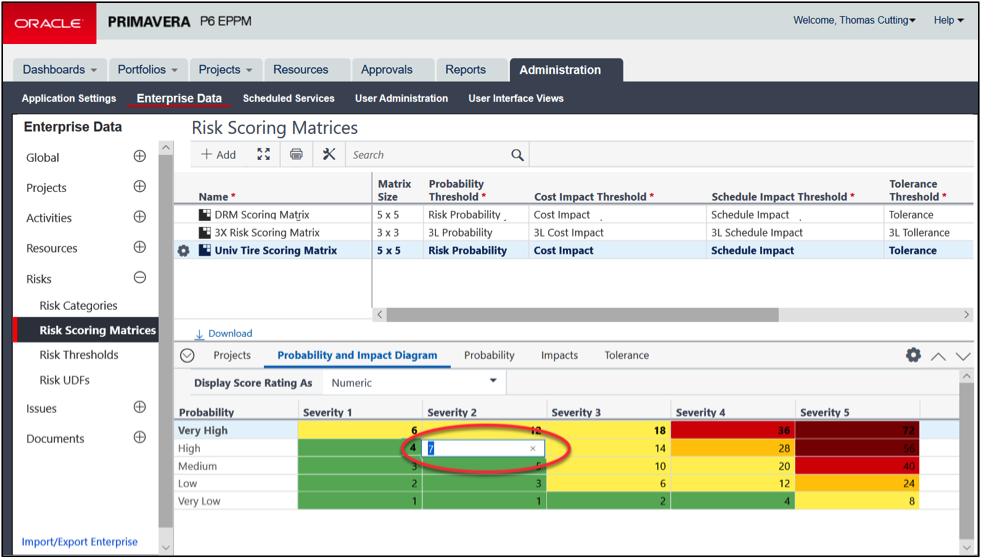
In the example above 7 has been assigned to where the High Probability intersects with level 2 or Low Impact (Severity). The values in this table should be defined as part of the Risk Management Plan.
Each project can be assigned a single Risk Matrix.
Since P6 EPPM identifies both Schedule Impact and Cost Impact, this matrix uses the highest impact value to determine the Risk Score. So when the Probability is High, Schedule Impact is Low, and Cost Impact is High, based on the matrix above, the value would be 28 instead of 7.
Perform Quantitative Risk Analysis
Qualitative Risk Analysis is a deeper dive into the impact the risks with the highest scores might have on the overall objectives of the project. Qualitative analysis typically is a time consuming process and may require additional tools to perform. Tools and techniques used to perform the analysis include:
- 3-point Estimating – calculates the optimistic, most likely, and pessimistic estimates for the activities or deliverables that would be impacted by the risk. In P6 EPPM, 3 separate copies of the schedule can be create to perform “What If” scenarios and determine the different cost and schedule values.
- Decision Tree Analysis – creates a diagram showing the implications of the different alternatives. Each branch represents an action with sub-branches to estimate the impact with a good, moderate, or poor outcome. This would typically be done outside of P6.
- Monte Carlo Analysis – a complex mathematical simulation that calculates schedule and cost variances based on the probability of an event or risk occurring. For example, the project may require a large quantity of lumber and you have estimated an 80% probability that the price could jump during the course of the project. This means that if the same project was executed 100 times, 80 of those times the price would jump and 20 times it won’t. Monte Carlo Analysis calculates a projected cost that accounts for those variables. It runs scenarios that include multiple and overlapping risks like this to provide an overall projected cost and schedule. Specialized software would be required to perform this analysis.
Plan Risk Response
A Risk Response Plan identifies what type of approach will be taken for each risk. That approach differs based nature of the risk and the probability and impact of the risk happening. There are four types of response:
- Avoid – take different actions to reach the project objectives that don’t have as high a risk.
- Transfer – shift the ownership of the risk by subcontracting it to a third party, locking in long term pricing on material, purchasing insurance against weather delays, or other actions.
- Mitigate/Reduce – take actions that will either reduce the probability of the risk happening or the impact to the project if it does.
- Accept – take no action and plan to absorb the impact if it happens. This is typically done if the probability or impact is low or the cost in time or money to do something about it is higher than the risk impact.
P6 EPPM records the risk response and identifies actions to be planned, assigned, and tracked in the Response Plans tab (G below) in the details area for each risk.
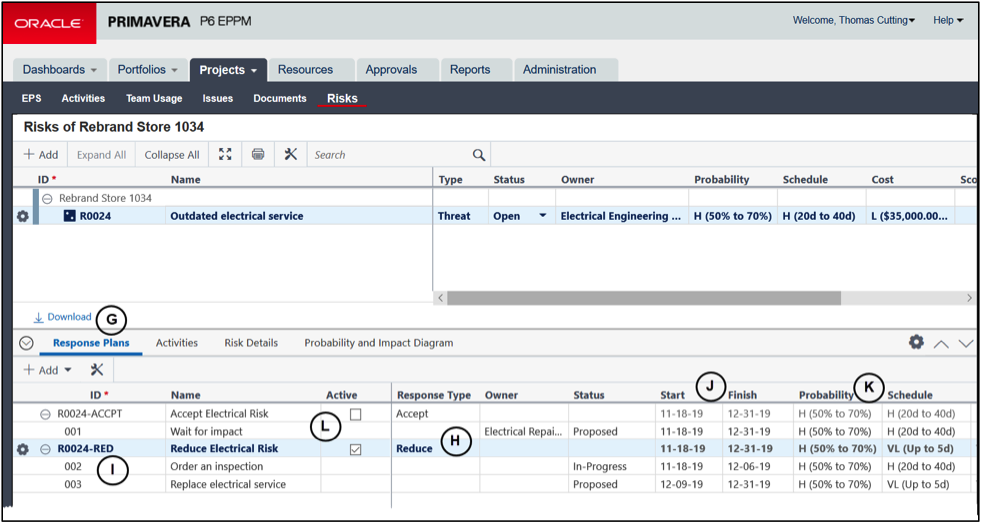
For each risk, multiple response plans can be created and assigned a Response Type (H) of Accept, Avoid, Transfer, or Reduce. Specific actions (I) plan out what is to be done when (J) and how the Probability and Impact (K) are altered if those actions are taken.
Each potential Response Plan is identified and detailed to the level needed to make the decision of which plan is the best option.
Implement Risk Response
Once a Response Plan is chosen, the Active (L) checkbox is selected and the response is put into action.
Monitor Risks
Risks need to be actively monitored and tracked. The status of existing risks (M) should be updated from Proposed to Open as they are accepted and then to Active when they are being executed.
Risks can be assigned to specific Activities (N) to tie them to points in the schedule, helping track the timing and impact.
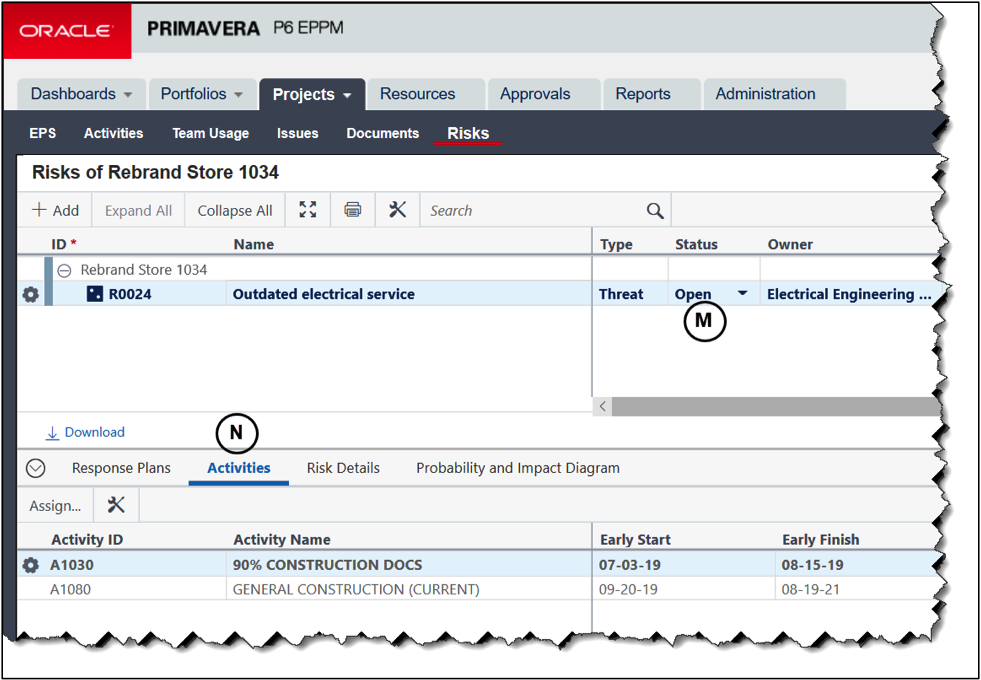
On a regular basis each existing status should be reviewed to determine if the Probability or Impact has changed as well as if the Response should be altered. Risks that are no longer a threat can be closed and new risks should be identified and added to the risk registry.
P6 EPPM provides status values of Proposed, Open, Active, Rejected (Closed), Managed (Closed), and Impacted (Closed). How and when these are used should be identified in the Project Risk Management Plan.
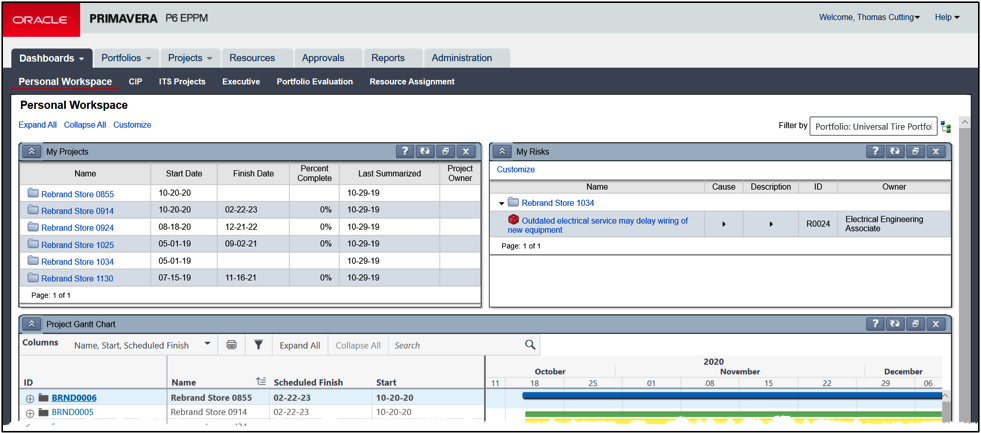
Risks can be displayed on a Dashboard and filtered by status.
Ultimately, how risks are managed within the project can determine success or failure. Using P6 EPPM’s Risk Management functionality will help reduce the chance of things going bad and the impact if they do.
