
FILTERING UNIFIER REPORT DATA
Oracle Primavera Unifier
Download the PDF here
This Tech Tip will outline various methods for filtering reporting output data.
Filtering methods include:
- During run time of an UDR
- Modifying Data View SQL
- In the RTF design template of a Custom Report
- During run time of a Custom Report
- During run time of an UDR
This project-level UDR lists the Change Orders for a project. If an additional UDR requirement was to return records specific to a Vendor, the UDR set up needs to be modified. As UDRs are an user-mode module, this can be completed by the user without assistance of an Unifier administrator or any Data View SQL knowledge (unless the UDR uses a Data View as its data source which is covered in method 2).

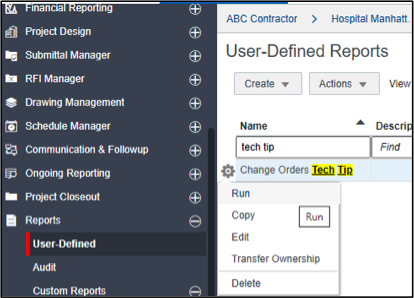
Locate the UDR from Reports > User-Defined within the shell’s Navigation Pane. With the UDR selected, click on the row menu (Cog icon) and select Edit from the menu pulldown to open the Edit Report window.
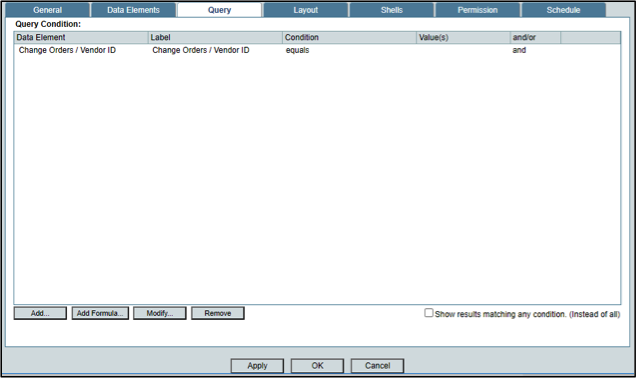
The filter condition is set up in the Query tab. Multiple conditions can be added though be aware of the check box ‘Show results matching any condition. (Instead of all)’. This determines whether the need is for any condition to be satisfied or all of them. In this example the single filter will be on Vendor. Click the Add button in the Query tab to open the Query Condition window.
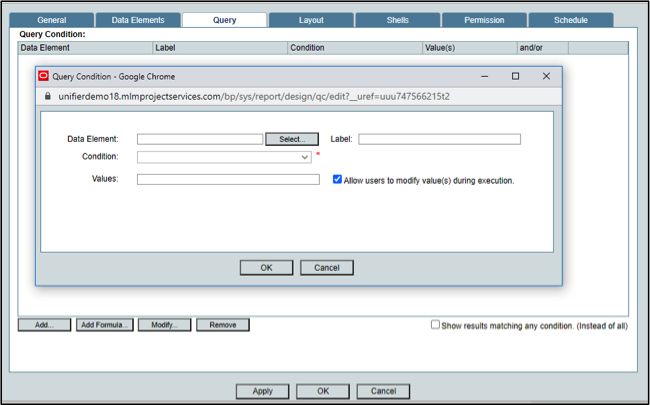
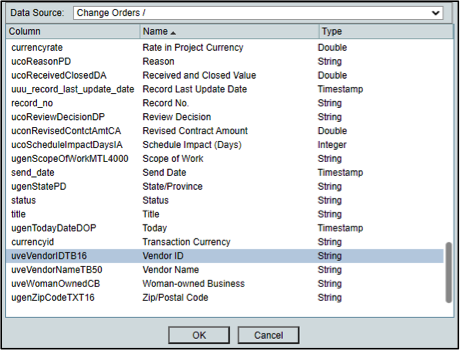
For Data Element (this identifies the filtering DE) click the Select button. This opens the Data Source window. Scroll down to locate the Vendor ID DE. Once selected click OK.
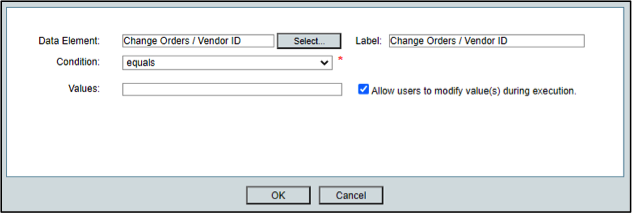
The Label can be changed if needed. Change the Condition to ‘equals’ so the user needs to enter the correct Vendor ID at run time. The other options are ‘contains’, ‘does not contain’, ‘does not equal’, ‘is empty’ ‘is not empty’. Values can be left blank. This would be if a default Vendor ID is set. The important setting is ‘Allow users to modify value(s) during execution’ checkbox. Leave this checked.
Click OK to return to the Query tab.
The filter condition is included. Click OK to return to the User-Defined Reports Log window.
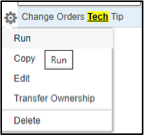
To run the UDR select Run from the Row Menu.
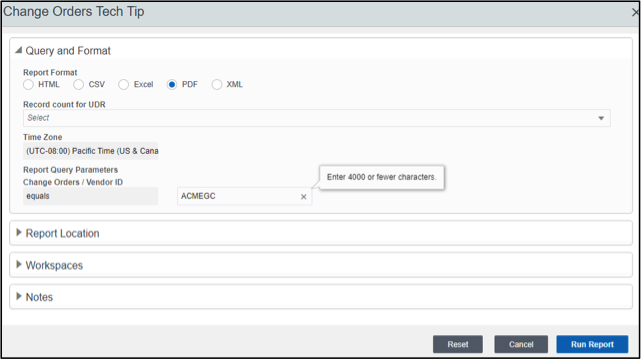
There is a new Report Query section in the Run window. Included is the query condition added. The user has the ability to add in an appropriate Vendor ID. Once entered, click the Run Report button. If the field is left blank all records are returned.
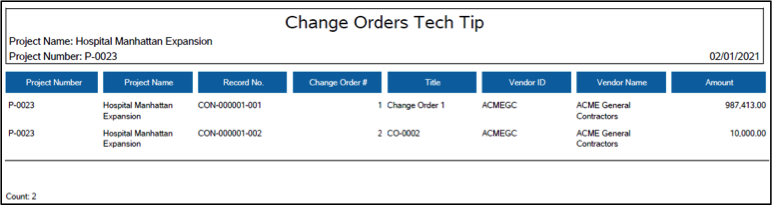
The UDR output now shows only the Vendor-specific records.
- Modifying Data View SQL
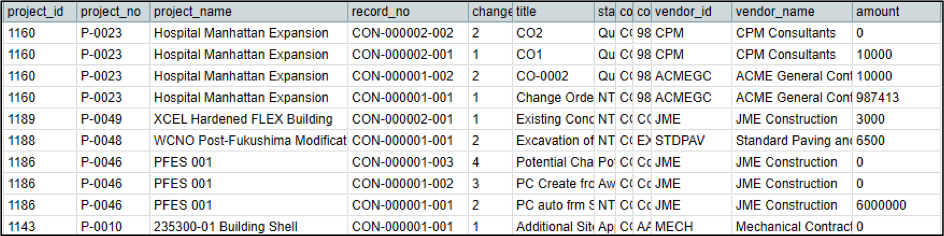
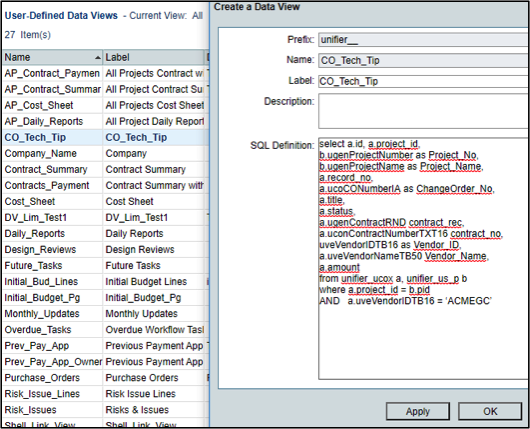
In this example the Data View contains a simple SQL statement that references key fields from the Change Orders BP. The SQL statement includes the project_id field which is a pre-requisite for shell-level Custom Reports. Aliases are used for each field to make it easier to identify the field. Example – ‘AS Project_No. ’The Data View result set lists all Change Order records.
In this example the SQL statement is modified so the rows returned will be specific to a Vendor.
The SQL includes a WHERE clause which joins the shell details table (us_p) with the Change Orders table (ucox) by project_id. This allows Project Number (ugenProjectNumber) and Project Name (ugenProjectNumber) to be included in the result set where these fields reside in the shell details table. In addition to joining tables where fields from different tables can be included, the WHERE clause can also include filtering conditions.
SELECT
a.id,
a.project_id,
b.ugenProjectNumber AS Project_No,
b.ugenProjectName AS Project_Name,
a.record_no,
a.ucoCONumberIA AS ChangeOrder_No,
a.title,
…
a.uveVendorIDTB16 AS Vendor_ID,
a.uveVendorNameTB50 AS Vendor_Name,
a.amount
FROM unifier_ucox a, unifier_us_p b
WHERE a.project_id = b.pid
This is the current output of the Data View.
A second line is added to the WHERE clause which will filter the result set to return records with the Vendor that has a Vendor ID of ‘ACMEGC’.
WHERE a.project_id = b.pid
AND a. uveVendorIDTB16 = ‘ACMEGC’
Open the Data View in Draft Mode and the additional line is added to the SQL statement. Click OK and publish the Data View.
The data view result set now shows only Change Orders records associated with the Vendor ID ‘ACMEGC’.

Note – this Data View can be used in an UDR to return the same Vendor-specific records.
- In the RTF Design Template of a Custom Report
This method uses the same Data View within the Custom Report. The difference here is that the filter condition is set within the RTF design template.
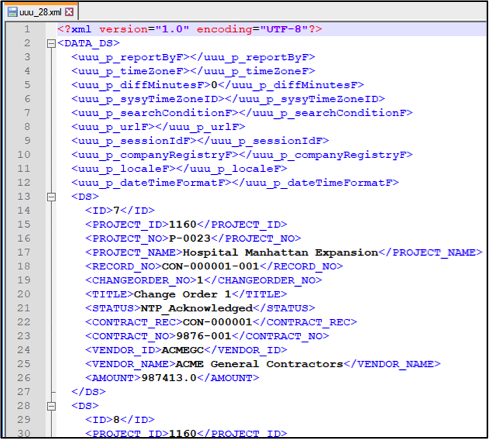
Below is the XML generated from the Custom Report’s Sample Data tab. These tag names are the aliases in the SQL statement. The VENDOR_ID tag name will be used for filtering in the RTF.
The RTF design has a simple record looping method using the ‘for-each’ (placeholder F) and ‘end for-each’ (placeholder E) XML tags .
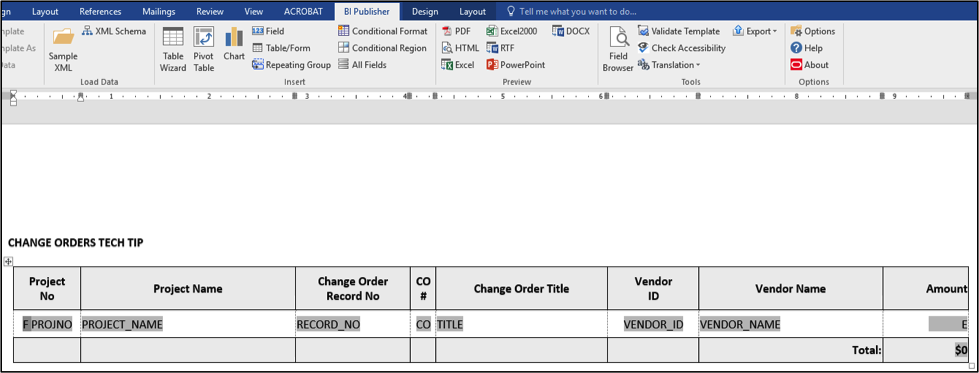
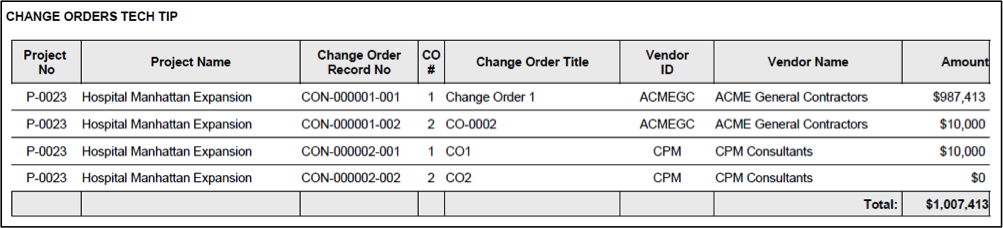
The PDF preview lists all Change Order records for the selected sample shell.
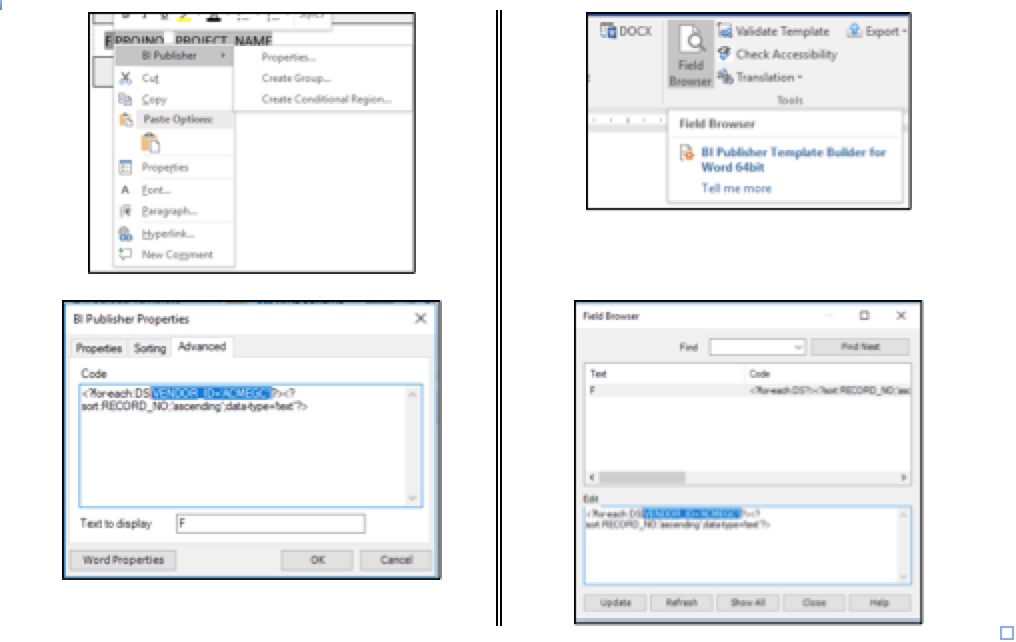
The filter condition is set in the for-each tag (placeholder F).
Highlight the F placeholder in the 1st column data row cell. Either right click and select Properties from BI Publisher menu item or click Field Browser from the BI Publisher ribbon. The following filter code [VENDOR_ID=’ACMEGC’] is included directly after the DS record name. Only output DS records that have a Vendor ID ‘ACMEGC’.
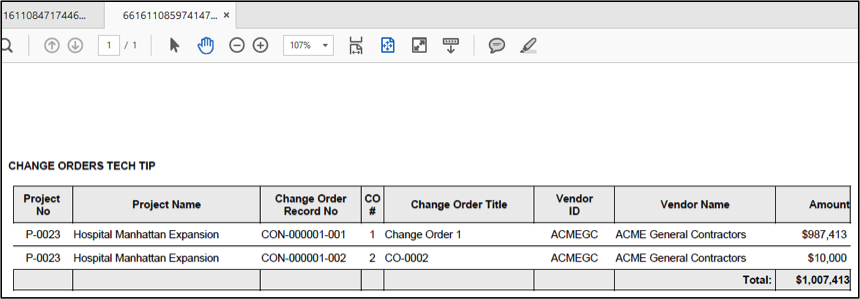
Click OK or Update depending on method used. The PDF preview now only shows records with a Vendor ID of ‘ACMEGC’. The overall Total still shows the Total for all records. The Total placeholder XML tag must also be modified with the conditional filter.
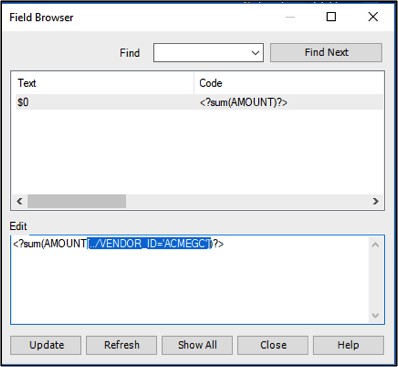
Highlight the Total placeholder and display the XML using the Field Browser method. Since the current XML is the total sum of all records the conditional code must be applied at the parent level. [../VENDOR_ID=’ACMEGC’] is included.
The PDF preview now has the Total summing correctly. Total for records with the specific Vendor ID.

- During run time of a Custom Report
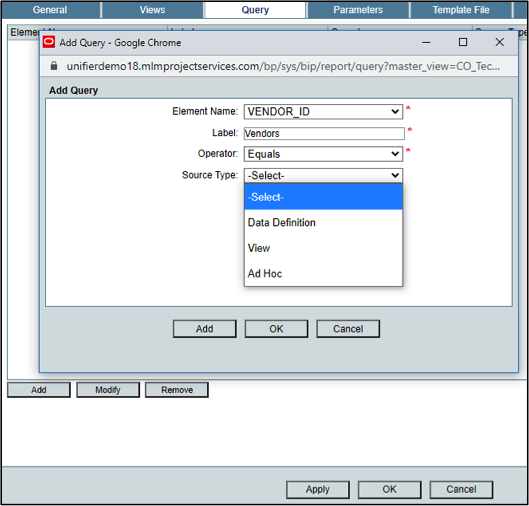
The Custom Report has three Source Type options by which a query condition can be set up.
- Data Definition
- View
- Ad Hoc
Click Add in the Custom Report’s Query tab to open the Add Query window.
Element Name pulldown lists the available Data Elements from the Custom Report’s Data View source. As with the previous filter methods, the Vendor ID will be the search criteria field.
The Operator pulldown has two options ‘Like’ and ‘Equals’. ‘Like’ allows the user to enter a number of characters (pattern) to perform a pattern search against the selected Element Name. Only records where the pattern matches are returned. This example uses ‘Equals’ where the user must enter an exact match of the Element Name values. Selecting the ‘Like’ Operator would disable the Source Type. This becomes redundant as the user enters a character pattern rather than selecting from a list.
Each one of the Source Type pulldown options provides the user (at run time) with a list to select from.
The Query tab supports multiple query conditions.
The following four sub sections outlines setting up each Source Type query condition.
4.1 Data Definition
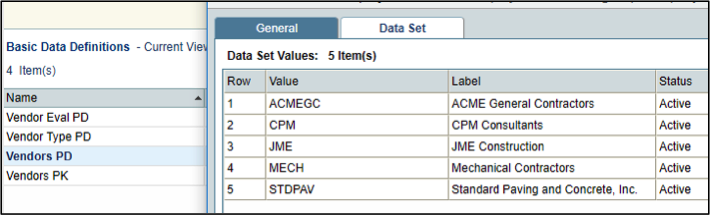
This option uses an existing Data Definition (pulldown type) as the data source. At run time the user selects from the Data definition list. A Vendors PD Data Definition has been created listing Vendors. The Value holds the Vendor ID for each row entry, and it is this column the records will be matched against. The Label values (Vendor Name) are what are displayed in the list. In working practice, the Data Definition would be in use (source for a Data Element) and therefore providing a valid entries.
The Vendors PD is selected. Selection Type ‘Single’ or ‘Multiple’ allows the user to either select only one item in the pulldown list or select multiple. This example will use ‘Single’. Click OK to return to the Query tab window.
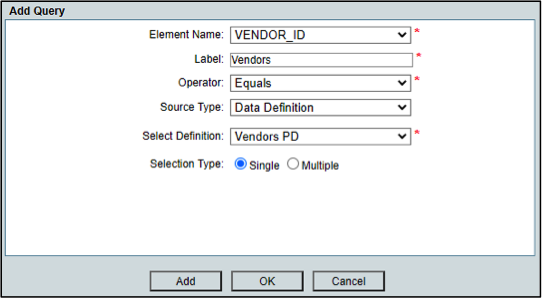
The query condition with Data Definition source type is now set up.

4.2 View
This option allows a Data View to be used as the data source. At run time the user can select from the Data View result set. It is the most flexible of all options as the Data View SQL can be specific in what data is returned. In this example, the user will be only selecting from Vendors referenced in Change Order records.
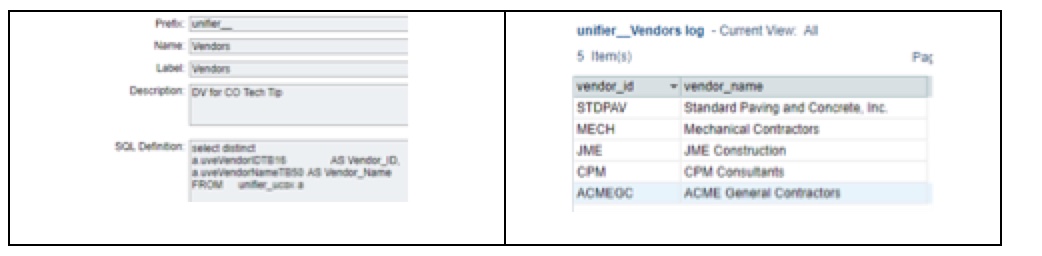
Select the appropriate Data View from the Select View pulldown. The Data Definition option had the Value and Label columns by design. In this case each one is manually selected. Again ‘Single’ would be selected.
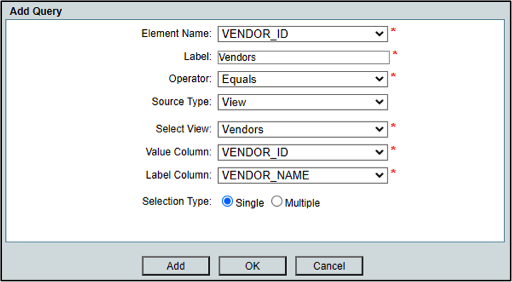
The query condition with Data Definition source type is now set up.

4.3 Ad Hoc
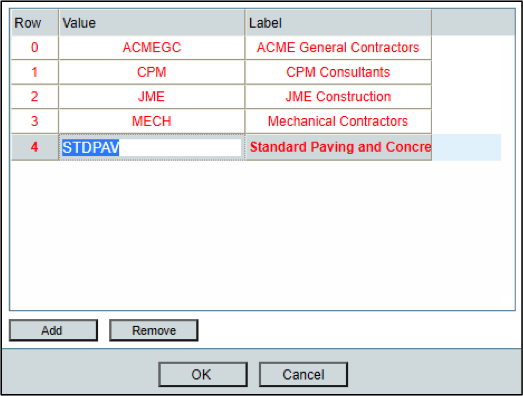
This is the least flexible of all the options. The list is manually entered and generally would be the least used option. Click the Add button to open the Ad-Hoc window.
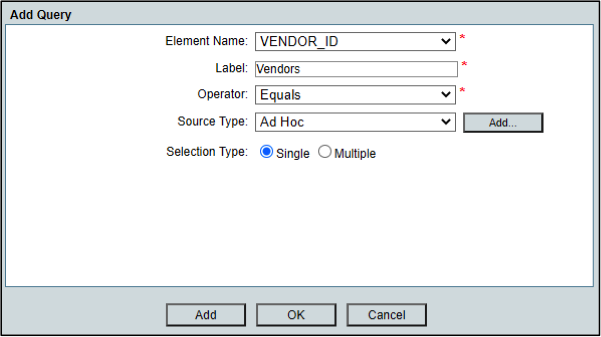
Add how many rows are required and enter the Value and Label entries. The window does not provide a re-order row feature so the entries must be entered in the correct order. Click OK when rows are completed.
The query condition with Data Definition source type is now set up.

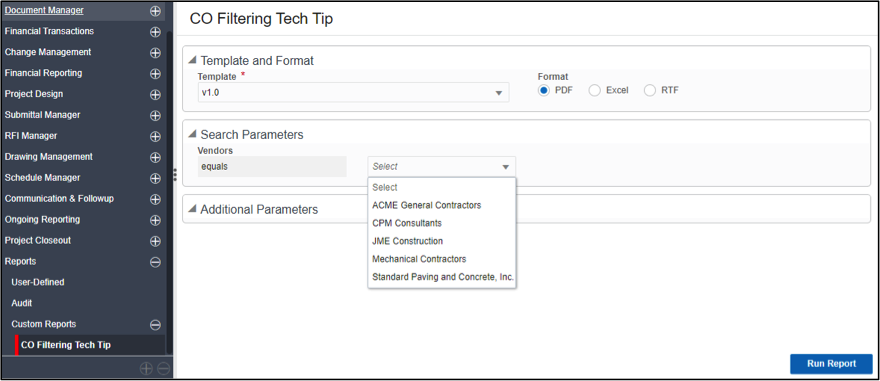
With the query condition in place, the Custom Report can be published and the report run from a shell. The Search Parameters section shows the Vendors query condition. Regardless of source type, the user will see the same pulldown list feature. If the Label ‘ACME General Contractors’ is selected, then the corresponding Value ‘ACME’ is matched against Change Order records referencing the same Vendor ID.
In summary, this Tech Tip provided different options to filter Unifier report data. Options (2) ‘Modifying Data View SQL’ and (3) ‘In the RTF design template of a Custom Report’ are primarily for specific reports where the filtered records are the objective of the report. Options (1) ‘Modifying Data View SQL’ and (4) ‘During run time of a Custom Report’ provide more flexibility and used for more general reports where the record count is extensive and a number of query conditions can subset that data for specific data selections.