
Overview
During the design and development of Unifier processes, one of the key aspects is the creation of the data elements that store the correct information and the data definitions that drive the data element. This tip outlines just some of the considerations when you are doing business process design and development in Unifier.
Data Elements Basics

In Unifier, each field on a Unifier business process form needs to be defined by using an existing or new data element. The data element includes the data element name (which is the reference found in the database—i.e. “field name”), a data definition source (which dictates what kind of field—picker, text box, etc.), and a Form Label—which is what displays in the input form.
In the illustration above, “Implementation Responsibility” has a USER PICKER data definition, which means the user will see a list of users.
You will see that there are three examples all using the user picker but have different names and labels, which means they are used in one or multiple processes as separate data elements.
Reuse or Create New?
For common elements, such as “Project Manager” or “Contract Number”, the best use is to create one data element and definition, and then re-use this same data element through all of your business process designs. You would not want to create separate data elements for “Project Manager” in each process (i.e. “RFI_PM”, “SUB_PM” etc.) The only case to have different data elements would be if in one process the field is labeled “Project Manager” and the next labeled “Project Director”. This could happen in large organizations where departments may call things differently.
The other consideration for using the same field across processes is when you are using the Autocreate function to create a new record from another. Here, the new record will automatically populate the same data fields (data elements) that are found in the source record. If the data elements are different then they will not copy over.
BP Picker vs. Pull Down List
In Unifier the primary method to provide a “pick list” of items is to use either a “pull down” list—where the data definition pre-defines the list globally or to use a “BP Picker” which loads the pick list from another BP.
The primary considerations on which to use are:
- Is the list global, or does it vary by project?
- Does the list get actively edited or added to all the time?
Here are a couple of examples:
- Submittal Disposition codes (e.g. “Approved as Noted”, “Rejected”)
- If this list is established and doesn’t change much at all then creating a pull-down list is the simplest and most effective way to create these.
- If this list varies by project and is not global, then a better method would be to create the list using a simple BP in each project and then use a BP picker.
- Contract Numbers
- If linking records to existing contracts, the most common method is to use a BP picker (for the Contract BP). In this way, the list actively updates as contracts are added.
- Vendors
- If linking a record to a vendor contact, the most common is to use a BP picker, since vendors are commonly added over time.
- State
- Most commonly this would be built out as a static pull-down list.
Checkboxes vs. Yes/No pull down
Unifier supports checkboxes as well as creating a Yes/No pulldown. The most common reason to use a pull-down list would be if the responses can be Yes/No/Not Applicable since checkboxes are strictly binary (checked/unchecked.) Also, there may be instances where having the Yes/No option would be clearer for the end-user. However, a field such as “Document Attached?” using a checkbox may be appropriate.
Record Titles
Another important consideration is the “title” of a document. By default, the Unifier “Title” field is predefined using a 50-character limit. Other data elements can be created for a record title using longer text sizes (128, 255 char, etc.); however, the default Title (50 characters) is the only title that displays in the Unifier TASK window. If you do NOT use the default Title field, this column will be blank in the Tasks view and users will not know the title of the document until they open it.
If this is not a critical issue for you, then you can create separate Title fields with a longer length to support a longer title.

Data Element Size
Along the lines of the Title discussion, it’s important when designing to make sure that your data definition accurately uses the correct length for the field. If you set a definition to 12 characters and find that later you want to make it 32 characters, you will have to create a new data element which then will not have the data found in the previous field. Also once you are in production, you cannot remove that old data element from the design, which can cause confusion.
If you are unsure, the best practice would be to make the field large enough to support what you think it may become.
The primary downside of longer fields is that the user CAN type in larger values etc.
Data Picker Filtering

When using Data Pickers, you can create query conditions that will filter or restrict the picklist to appropriate elements.
In the example, the “From Contact” picker will display contacts from a particular “company” and only where the contact record is “active”—so that you cannot pick contacts from other companies, nor can you pick contacts at the company that are no longer there.
This configuration is done at each bp design, making the re-use of data elements simpler by eliminating the need to create separate custom data elements, while providing the end-users with an accurate list.
Dynamic Data Sets

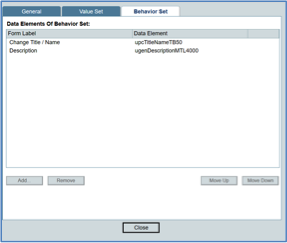
The last topic here is Dynamic Data Sets. These are built to allow multiple fields to logically. These start with a master data element on your form and then, the selection you make in that pull-down will affect other fields either by modifying their “value” or by modifying their “behavior.”
In the example above “Initiate potential change”—a yes or no—there are two fields (Change Title and Description) that get modified to be made “required input” if the initial change is set to YES. If the Initiate change is set to NO, then these fields are disabled. This eliminates some of the data entry errors that can occur.
The other type “Value Set” would typically be a nested dropdown. An example might be where selecting a “state” in the master element would then filter the “city” list value to only those cities found in that state.
Summary
These are just some examples of the flexibility in configuring data fields in Unifier to make your information accurate, reduce data entry errors and also simplify the user experience by providing direction to the users.