OPTIMIZING RESOURCE ALLOCATION WITH RESOURCE LEVELING
ORACLE PRIMAVERA P6
DOWNLOAD THE PDF HERE
Primavera P6 is a robust project management tool that enables organizations to plan, schedule, and control complex projects. One of its powerful features is resource leveling, which optimizes resource allocation to prevent overallocation and ensure smooth project execution.
Understanding Resource Leveling
Resource leveling in Primavera P6 adjusts the start and finish dates of activities based on resource constraints. It aims to balance the demand for resources with the available supply, in order to limit resource over allocation.
Steps to Perform Resource Leveling in Primavera P6 Professional
1. Open Your Project:
- Launch Primavera P6 Professional and open the project you want to work on.
2. Review Overallocation:
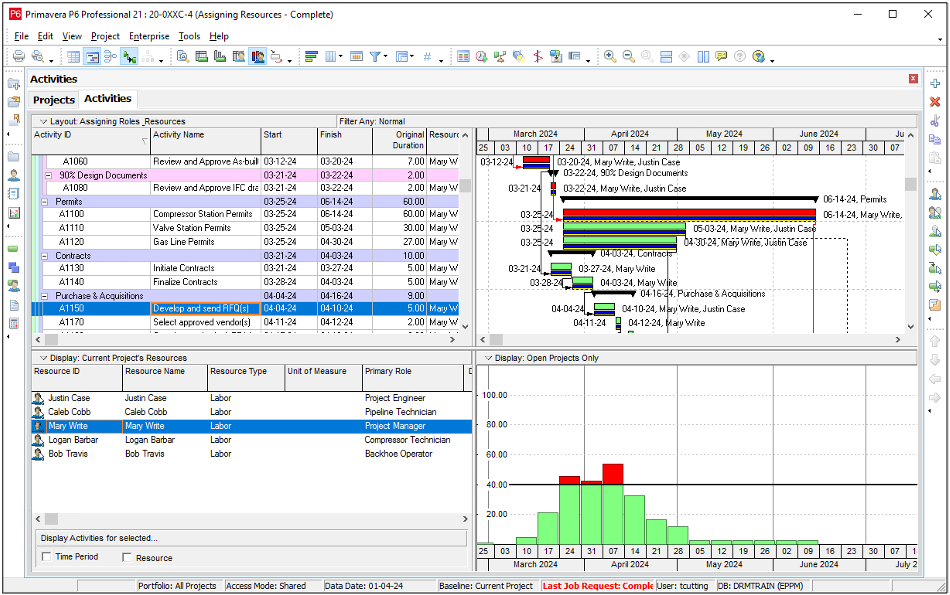
- On the Activities window, select the Resource Usage Profile option (View / Show On Bottom / Resource Usage Profile) to display the allocation graph in the Details section.
- In the left hand side of the Details window, click on the Display bar and set:
- Select View = By Resource
- Filter by = Current Project’s Resources
- Select a resource and look for red capped bars in the right hand side graph. These are the individuals that need to be leveled.
3. Access the Resource Leveling Tool:
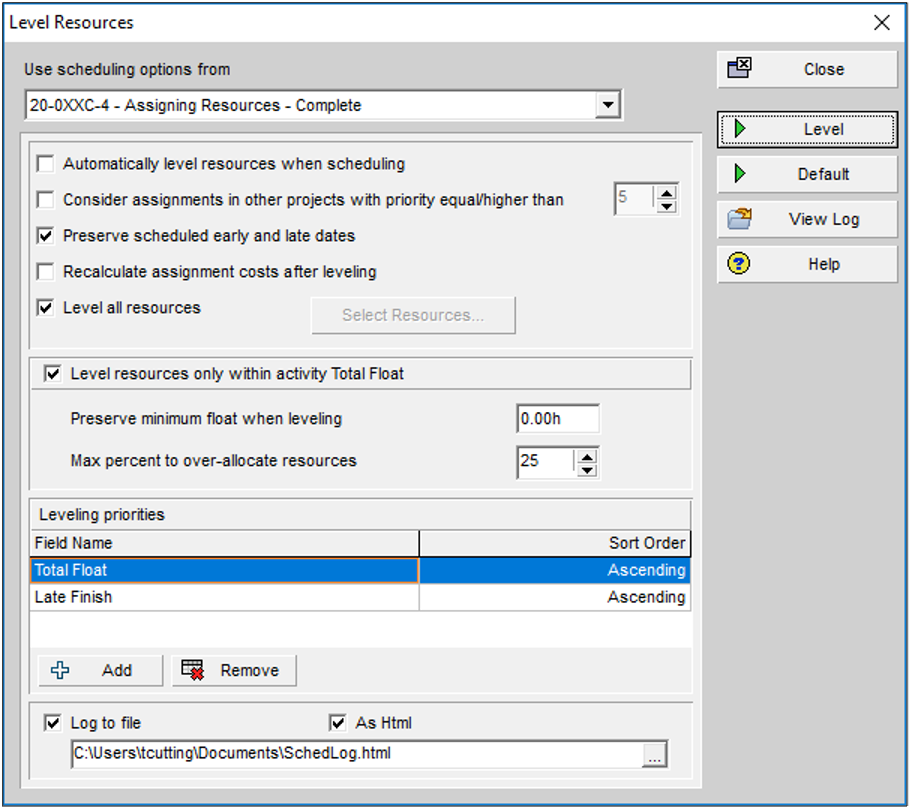
- Navigate to the Tools menu and select Level Resources (Tools / Level Resoruces or <Shift> F9). This opens the Resource Leveling dialog box.
4. Set Leveling Options:
- Use scheduling options from: The options for leveling are set for each individual project. If you have more than 1 project open, use the dropdown option for “Use scheduling options from…” to pick the right project.
- Automatically level resources when scheduling: This option will level the project at the same time the schedule tool is run. The recommendation is to not select this and run the leveling manually when needed.
- Consider assignments in other projects with priority equal/higher than: By selecting this, the usage of the resources in other projects will impact their availability for the projects you are leveling.
- Preserve scheduled early and late dates: This attempts to move activities within their scheduled dates. It works in conjunction with the “Level Resources only within activity Total Float” option.
- Recalculate assignment costs after leveling: When leveling resources, the activity assignment dates may extend into different cost ranges for the resources. This option recalculates those costs when the leveling tool runs.
- Level all resources: Selecting this option runs the level tool for all resources. Unselect it and click Select Resources to pick the specific resources to level.
- Level resources only within activity Total Float: Selecting this option also selects “Preserve scheduled early and late dates”. By using the Total Float as a guide, the leveling tool will attempt to keep the scheduled finish date. You can also specify the minimum float to keep and a percentage over-allocation you are comfortable with.
- Leveling priorities: Choose the priority by which activities will be leveled. Options include Total Float, Activity ID, Early Start, etc. The order in which they are listed is the order in which resources are assigned to activities. Typical starting values are the Late Finish Date and Total Float so that those activities that need to finish earlier or have fewer days within which to move are schedule first. Only the fields selected will be used when leveling (ex. If Activity Priority is not listed, it will be ignored).
- Log to file: Log to file captures the results of leveling and writes it to a file. Review this to identify the activities that were changed during the leveling process.
5. Level Resources:
- Click Level to start the resource leveling process. Primavera P6 will analyze the project schedule and adjust activities to balance resource utilization.
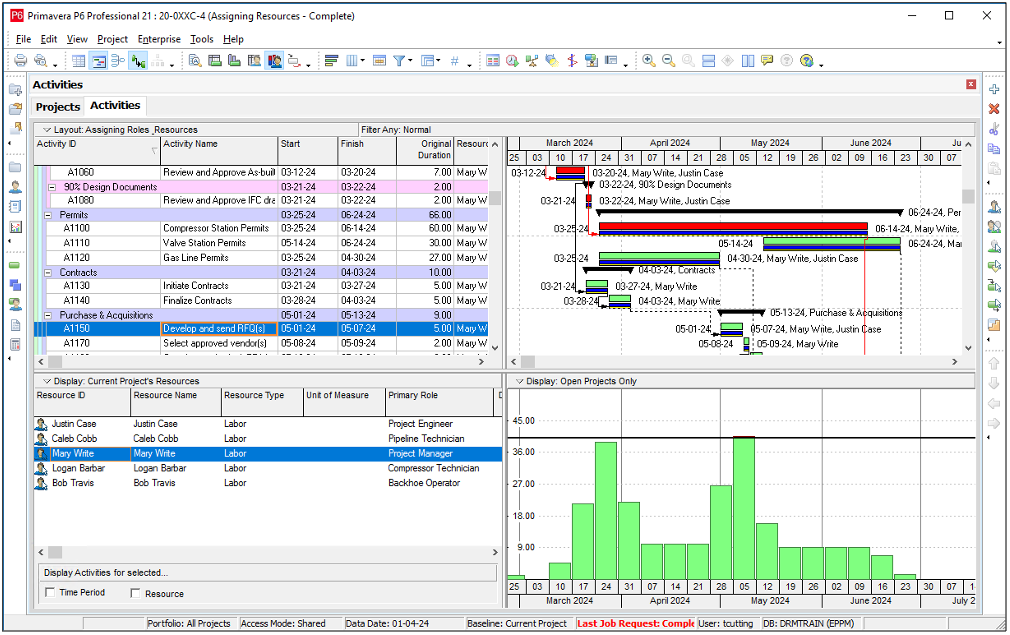
6. Review the Leveled Schedule:
- After leveling, review the updated schedule to ensure it meets project objectives. Check for any critical path changes or significant impacts on project timelines.
- If you do not like the results of leveling, you can reschedule your project and all leveling will be removed.
- The Leveling Log will show which activities have changed and any that couldn’t be leveled. To retain the changes, you can change relationships or add constraints to specific activities.
Leveling Mechanics
- Shifting Activities: The leveling tool looks for a time slot to accommodate the full assignment. It will not divide the activity into multiple segments. If it does not find a location, the activity will not be moved.
- Order Preserved: The relationships between activities is kept intact. Activities will not be sequenced out of order when leveling.
- Resource Curves Ignored: Resource Assignment Curves (Front-Loaded, Backloaded, etc.) are not used when leveling. Interestingly, manual future period values are takend into consideration.
Tips for Effective Resource Leveling
- Regular Updates: Regularly update your project schedule with actual progress and resource availability to ensure accurate leveling.
- Monitor Critical Path: Keep an eye on the critical path after leveling, as resource adjustments can shift critical activities.
- Use Constraints Wisely: Apply constraints carefully to control the start and finish dates of critical activities without overly restricting the schedule flexibility.
- Resource Calendars: Utilize resource calendars to account for non-working days, holidays, and resource-specific availability, which can improve leveling accuracy.
Conclusion
Effective resource leveling in Primavera P6 ensures optimal resource utilization and smooth project execution. By following these steps and tips, you can reduce resource overallocation, minimize delays, and keep your project on track. Regularly updating and reviewing your schedule will further enhance project management efficiency and success.


