Overview:
When analyzing a P6 schedule if the logic is acting strange or erratic, it could be a lag preventing the activity from starting or finishing during the desired timeframe. This edition of Tech Tips will look at the definition of a lag and different ways to identify the presence of lags in schedules. When a P6 user is able to view lags, they are now empowered to make a decision whether to modify or remove the lag entirely. The goal of this paper is to equip the reader with techniques providing increased visibility of lags in P6 schedules which will allow for: evaluation, modification, or delete.
Definition:
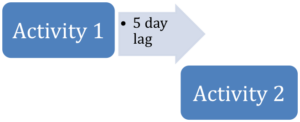
A lag is component of the predecessor or successor relationship that creates a delay. In a sense it acts like a constraint in FS relationship, not allowing the successor activity to start until the specified number of days has occurred. Schedulers are very talented and creative people, if you asked a large group of them what is the acceptable duration for a lag, certainly there would be a variety of different answers. Generally speaking a lag should only be used for short durations, roughly 2 weeks (or less). DCMA guidelines have an indicator for activities with lags comprising 5% (or less) of all activities in the schedule.

Schedules without sufficient detail such as summary schedules or high level schedules might have valid reasons to use lags. This may help preserve the schedule cadence and flow, especially during the planning process when dates shift from quarter to quarter or year to year. For more detailed schedules, best practice is to use an activity. An activity allows for visibility in the Gantt chart and more description in the Activity Table. It’s also convenient to adjust the duration of an activity, compared to a lag. This will prove beneficial when changes inevitably occur to the project plan.
How to identify lags in P6 schedule on a specific activity:
First off, let’s examine the Activity Details window. Under the Relationships tab, there should be a column for lags on both the predecessor & successor sides. These columns are customizable, just like the Activity Table. Make sure the Lag column is clearly visible, rearrange by right-clicking “customize activity details” or dragging and dropping in the window. This view provides a lot of information as there could be lag on the activity predecessor, activity successor, or both. Activity Detail window will display all the lags associated with this specific activity.

Identifying lags on all activities in a P6 schedule(s):
Updates to Primavera P6 EPPM from version 16.1 on, have introduced new columns called “Predecessor Details,” and “Successor Details.” These improvements now allow the User to view Lags and their respective durations, directly in the Activity Table. This offers a major advantage; no longer does the User have to go through the schedule line by line searching the Activity Details to find the Lags. It also allows for multiple projects to be viewed at the same time. Lastly, just like the regular Activity Table, this data could be copied and pasted to Excel. This allows for filtering, sorting, and other Excel functions.

Creating a report recognizing lags in a P6 schedule(s):
Not every User will have access to the previously mentioned technique. For older versions of P6, a helpful report can display which activities have lags along with their respective projects. A quick internet search will lead you to articles on this topic, which I used to create my first lag report. It’s great to see schedulers sharing such valuable techniques and information related to our profession. In that spirit, the steps below will quickly and easily produce a tool that you can use immediately.
1. Open the reports tab in P6 by selecting “Reports,” from the Toolbar icons (default location is left vertical edge of screen) additionally, reports can be accessed through the Tools menu.
2. Next, you’ll want to launch the Reports Wizard. Again, there are a few different ways to do the same thing: Toolbar icon (default location is right vertical edge of screen) , also from the Edit menu , or by right clicking the mouse which subsequently lists the command for the “Hot Key,” Insert.
3. For the subject area, we’ll want to look at “Activity Relationships.”

4. Click “Next,” until you get to Configure Selected Subject Areas. Then select columns to arrange the report just as you would arrange an Activity Table layout or Activity Details window.


***Special note for column headers Predecessor ID/Name and Successor ID/Name: these will all appear listed generically as Activity ID/Name. Be sure to track how the report is constructed.***
5. For Group & Sort options, “Project” is recommended to enable the opening of multiple projects.

6. Filter on “Lag,” so the report will only show activities with lag.

7. Create a title for the report, and then run the report. Final step, and one of the most important, is to save the report so it can be accessed again. Finally, click Finish and you are done! Below is a sample report of the test project.


Summary:
One of the most difficult aspects of lags in a schedule is the lack of visibility. This edition of tech tips offers various tools to assess and analyze the presence of lags in a particular schedule or schedules. Once identified, the scheduler will be able to determine if the lags require modification or removal.
